switch
NotOpodcast: Episode 2
Welcome to the second episode of NotOpodcast, where Kilroy and Michael join me to discuss a variety of topics such as the rumored new versions of the Xbox One and PS4 consoles, the ways software is changing the hardware landscape, and how cheap we'd be willing go when choosing a firearm.
The timecodes are:
Gaming - 1:54
Technology - 19:26
Firearms - 27:37
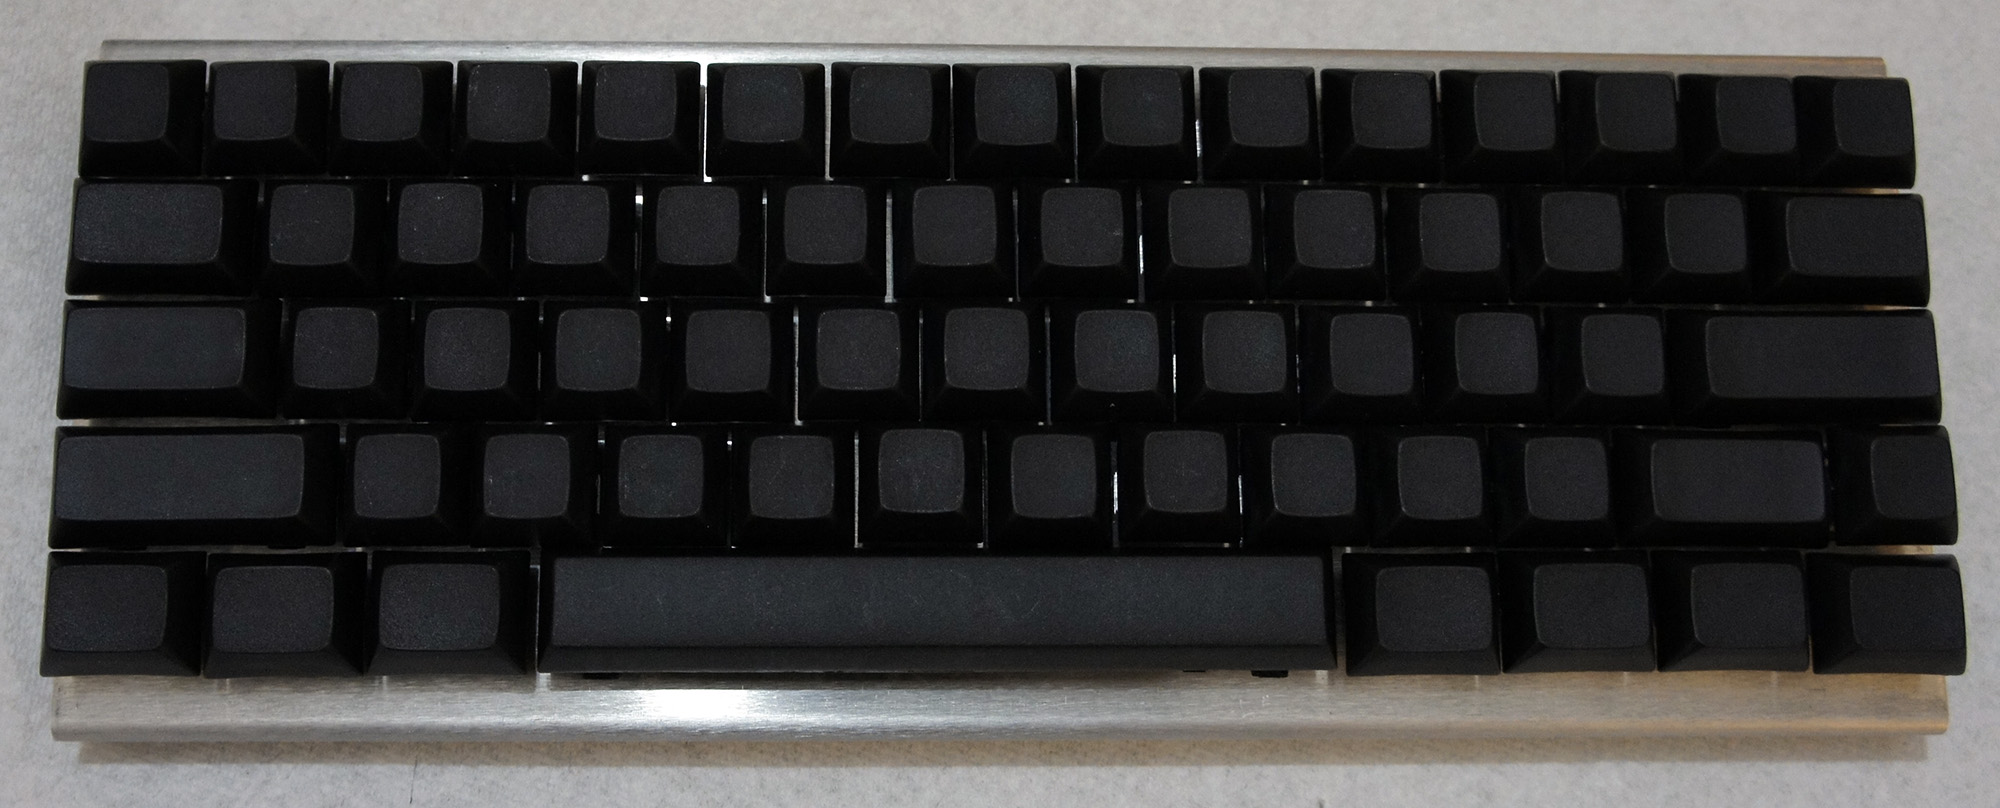
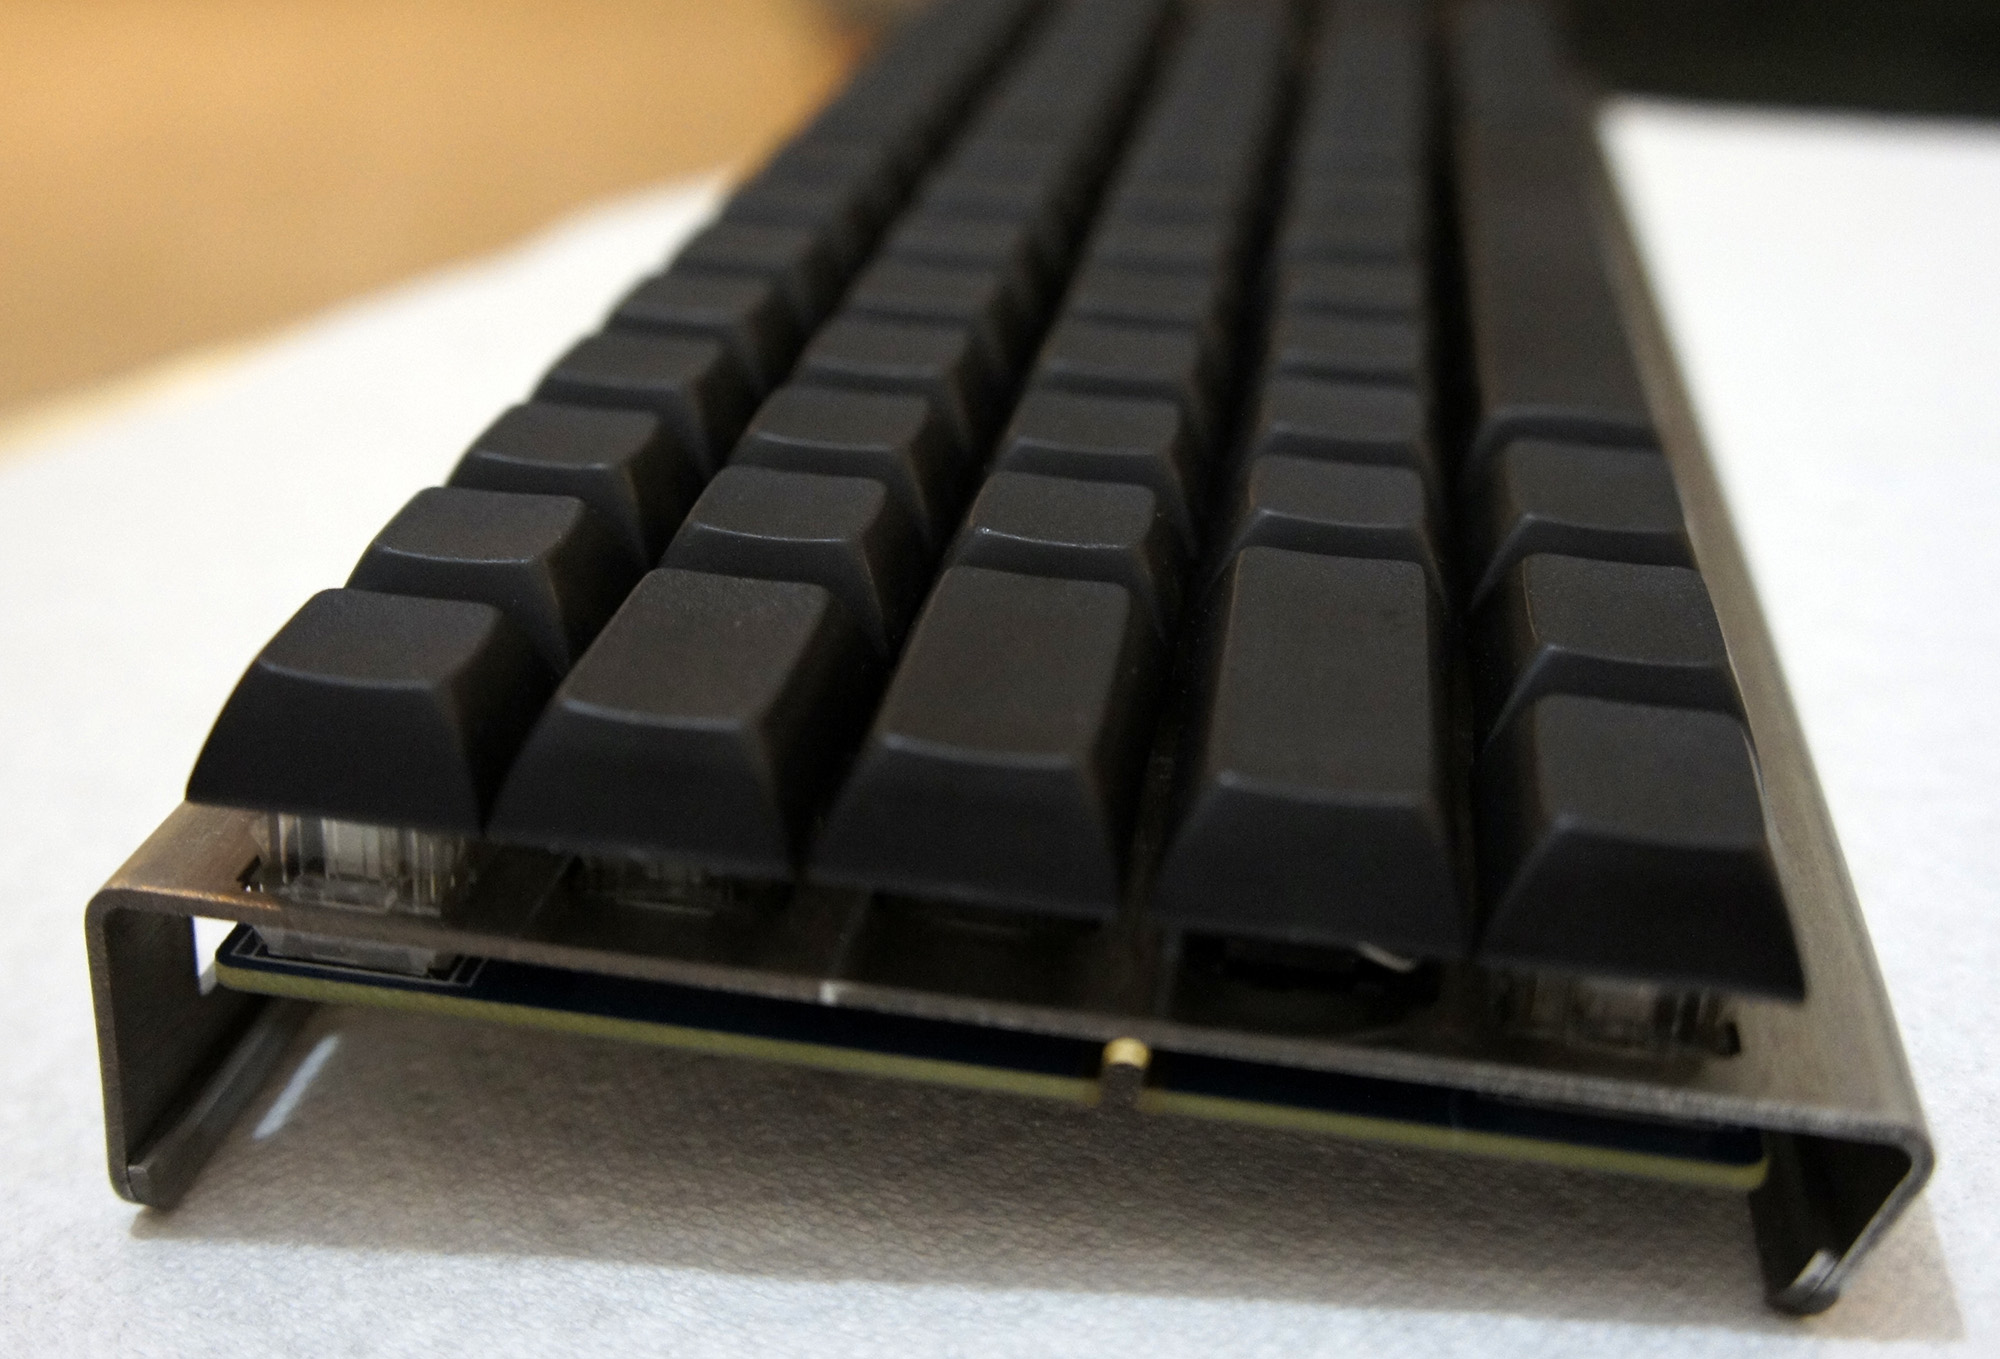
Infinity Keyboard: Building My Own Mechanical Keyboard
I’ve written a lot about mechanical keyboards in the past, but beyond user experience, I’ve never really had any other type of interaction with a keyboard. When I saw the Infinity Keyboard Kit for sale on Massdrop, I was enticed by the prospect of a keyboard with aspects that I could customize, but more importantly, the opportunity to build my own keyboard.
When I first purchased the kit, it was somewhat intimidating. As a software developer, any task remotely related to electrical engineering is a strange and scary one, but I figured I’d give it a shot anyways.
Choosing the Keyboard
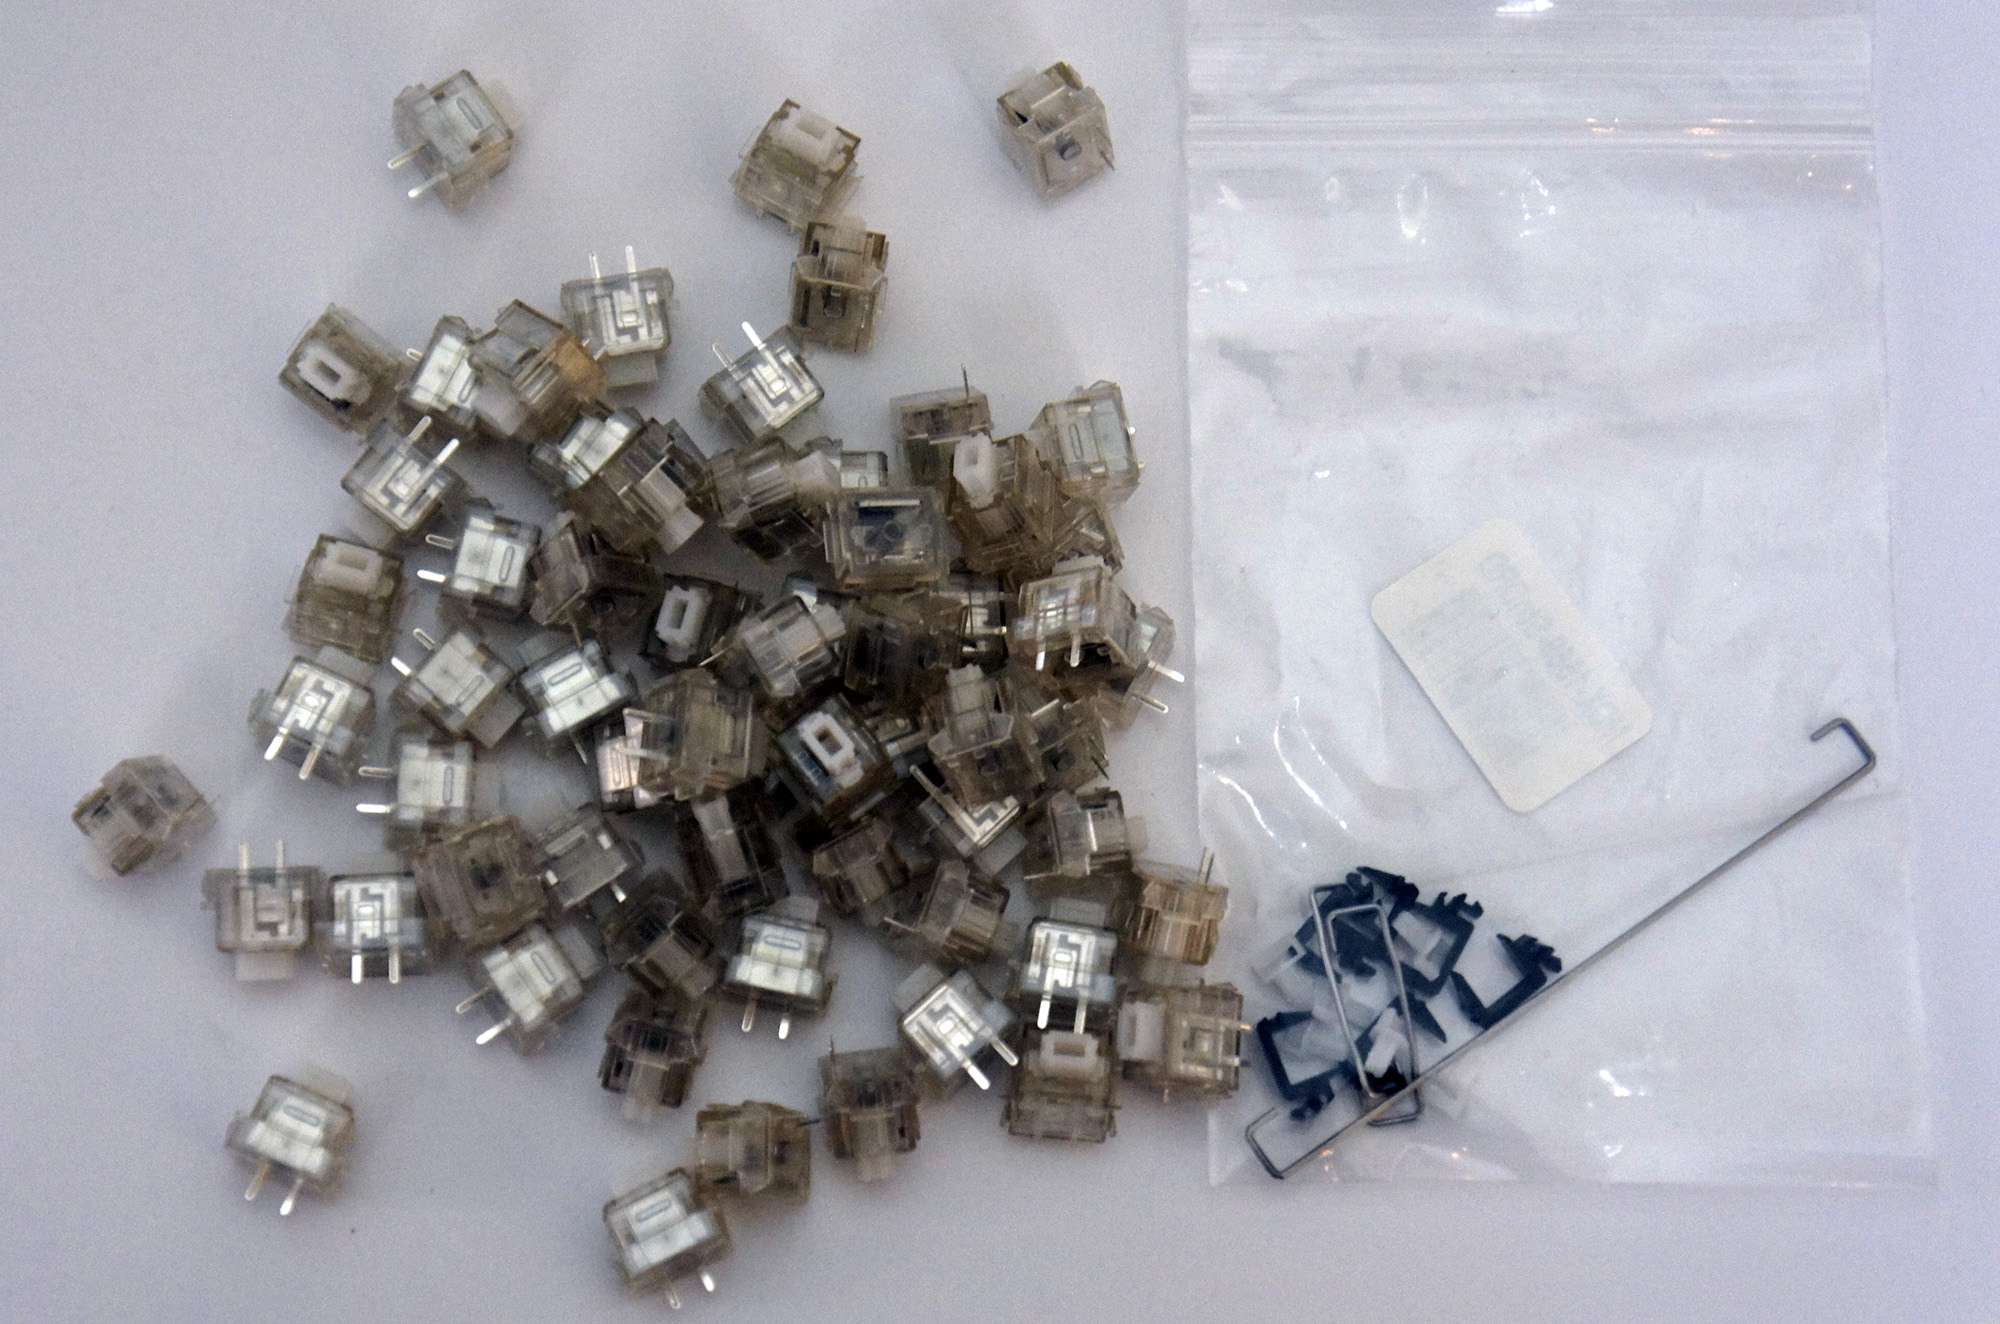
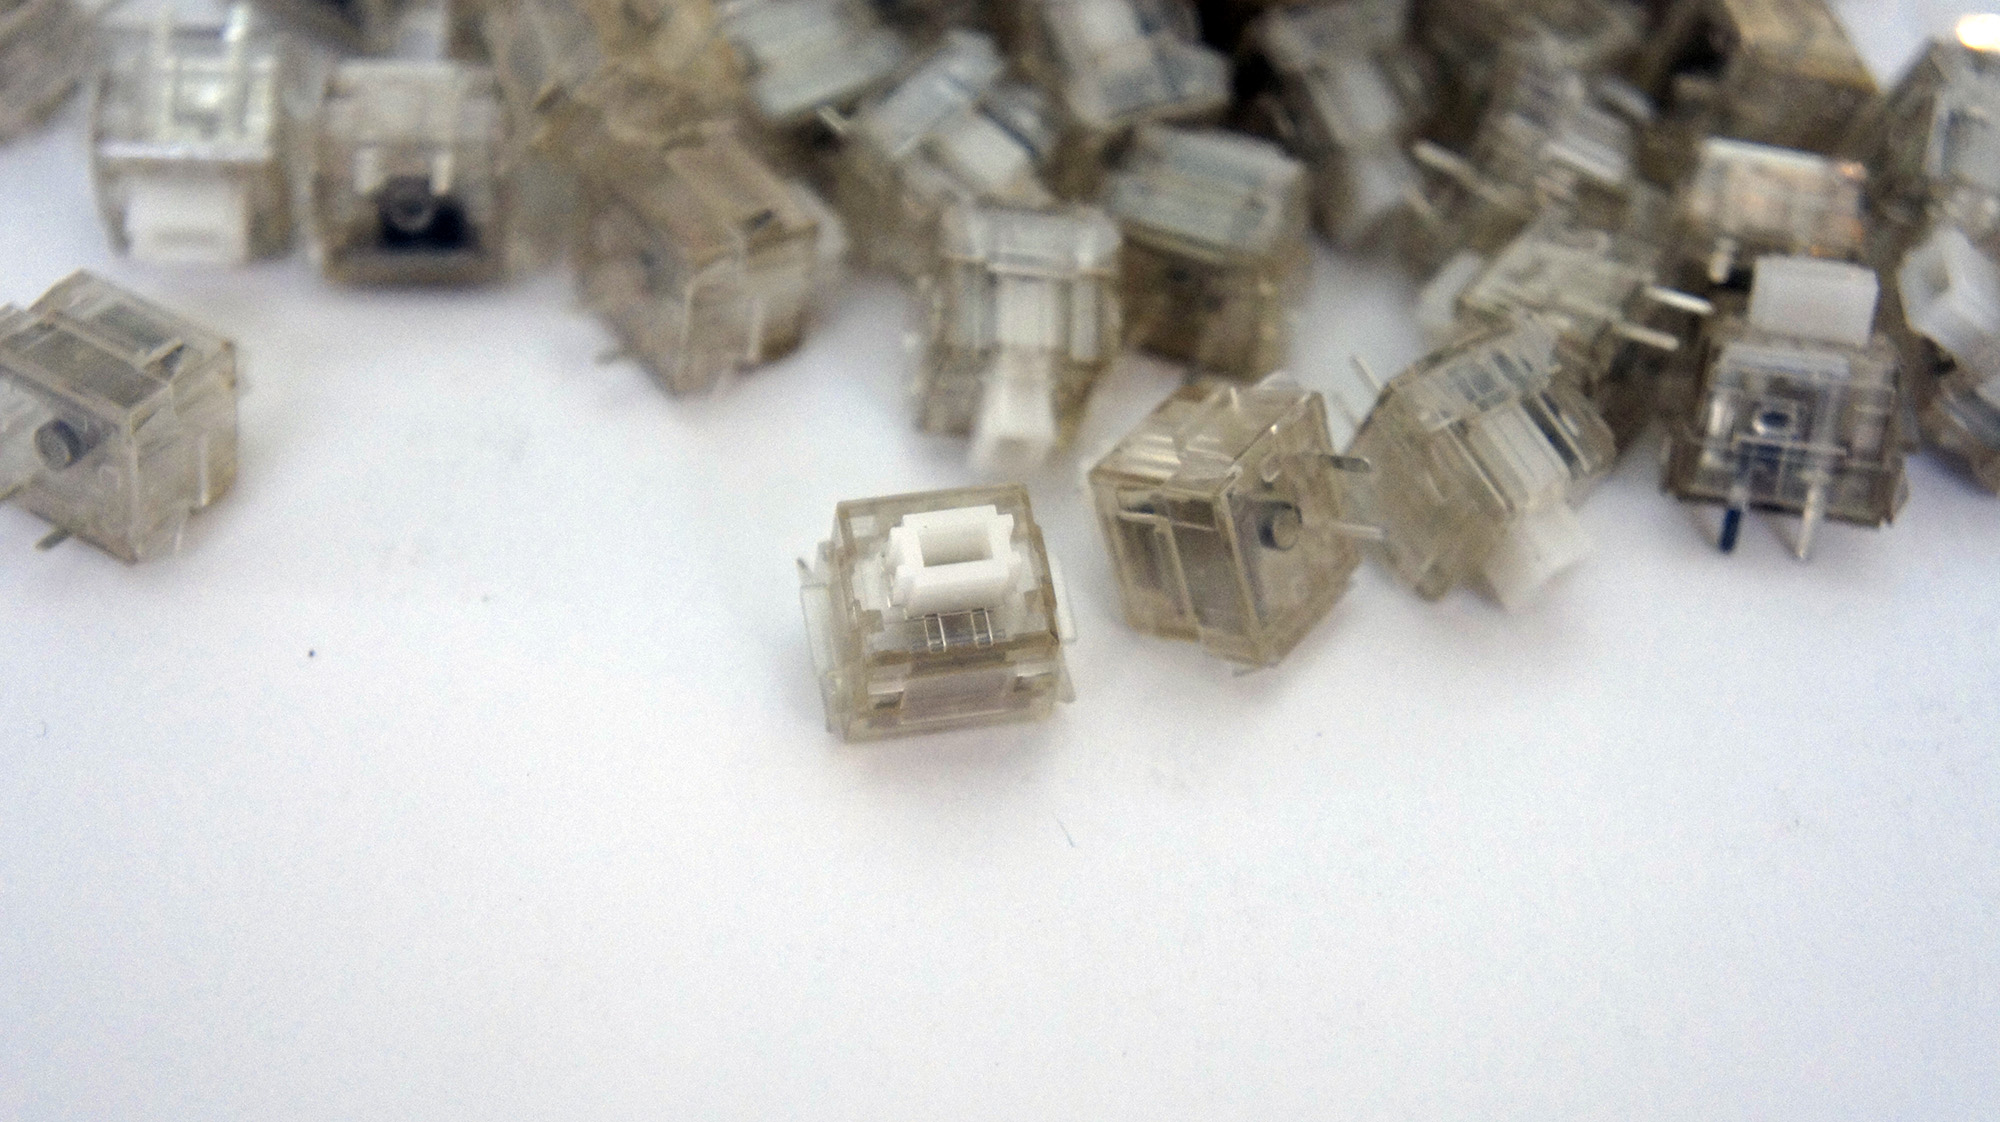
I ordered the kit with Matias Alps Clicky key switches, as I’m a huge fan of Cherry MX Green switches and thought the Alps switches might provide a similar but new experience.
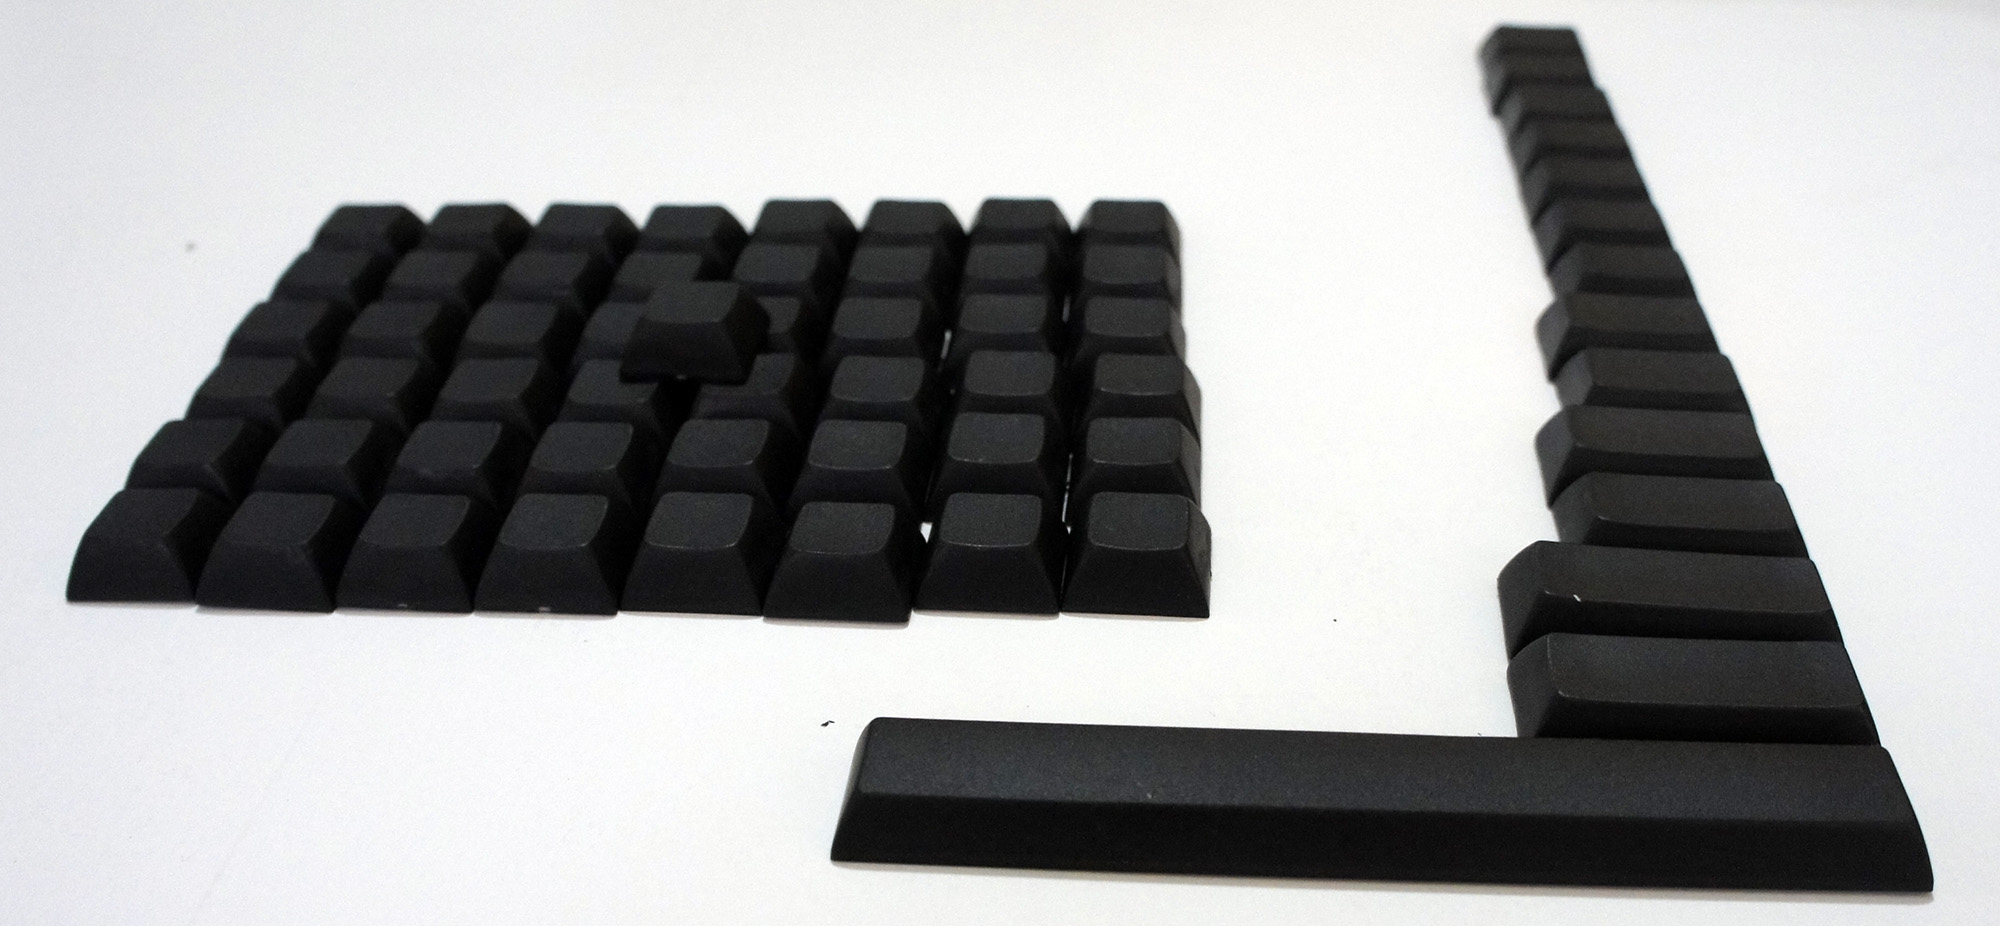
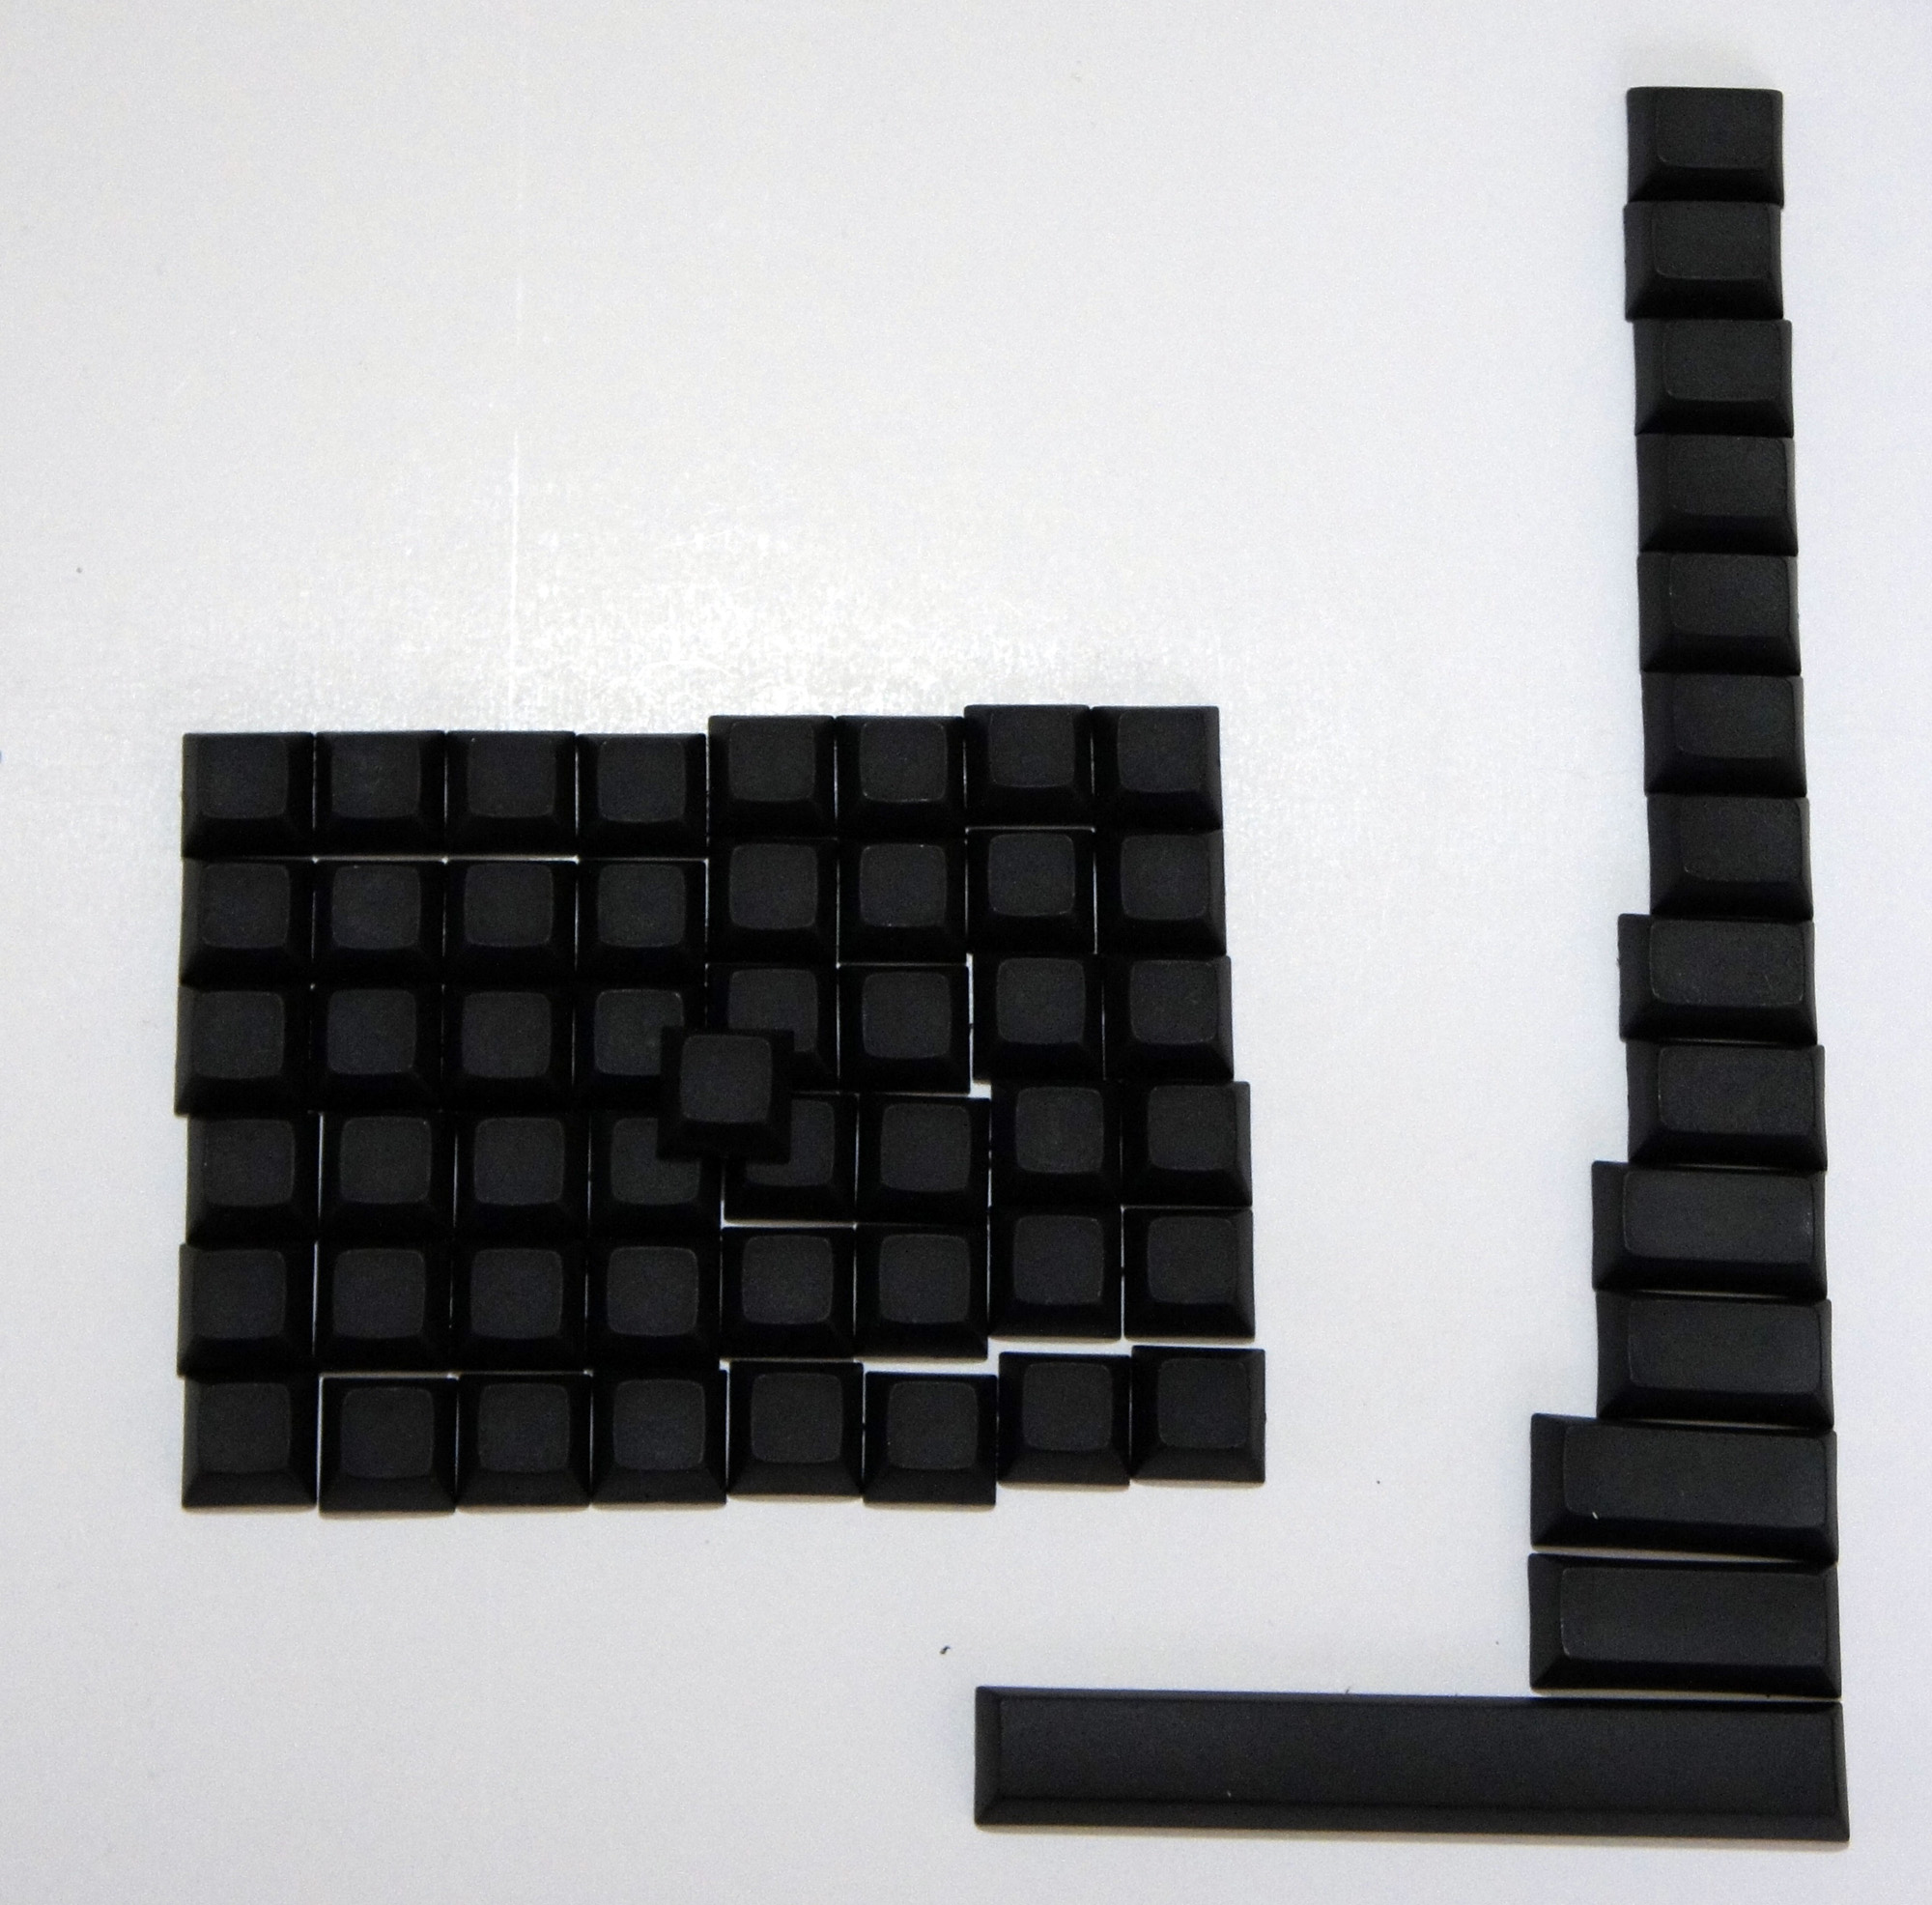
Next, I picked the blank Signature Plastics PBT keycaps available as an option on the Massdrop purchase, as finding Matias-compatible keycaps is not an easy task. Plus, the blank keycaps would come in handy when I started messing around with the keyboard configurations.
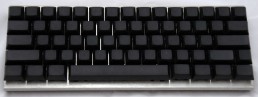
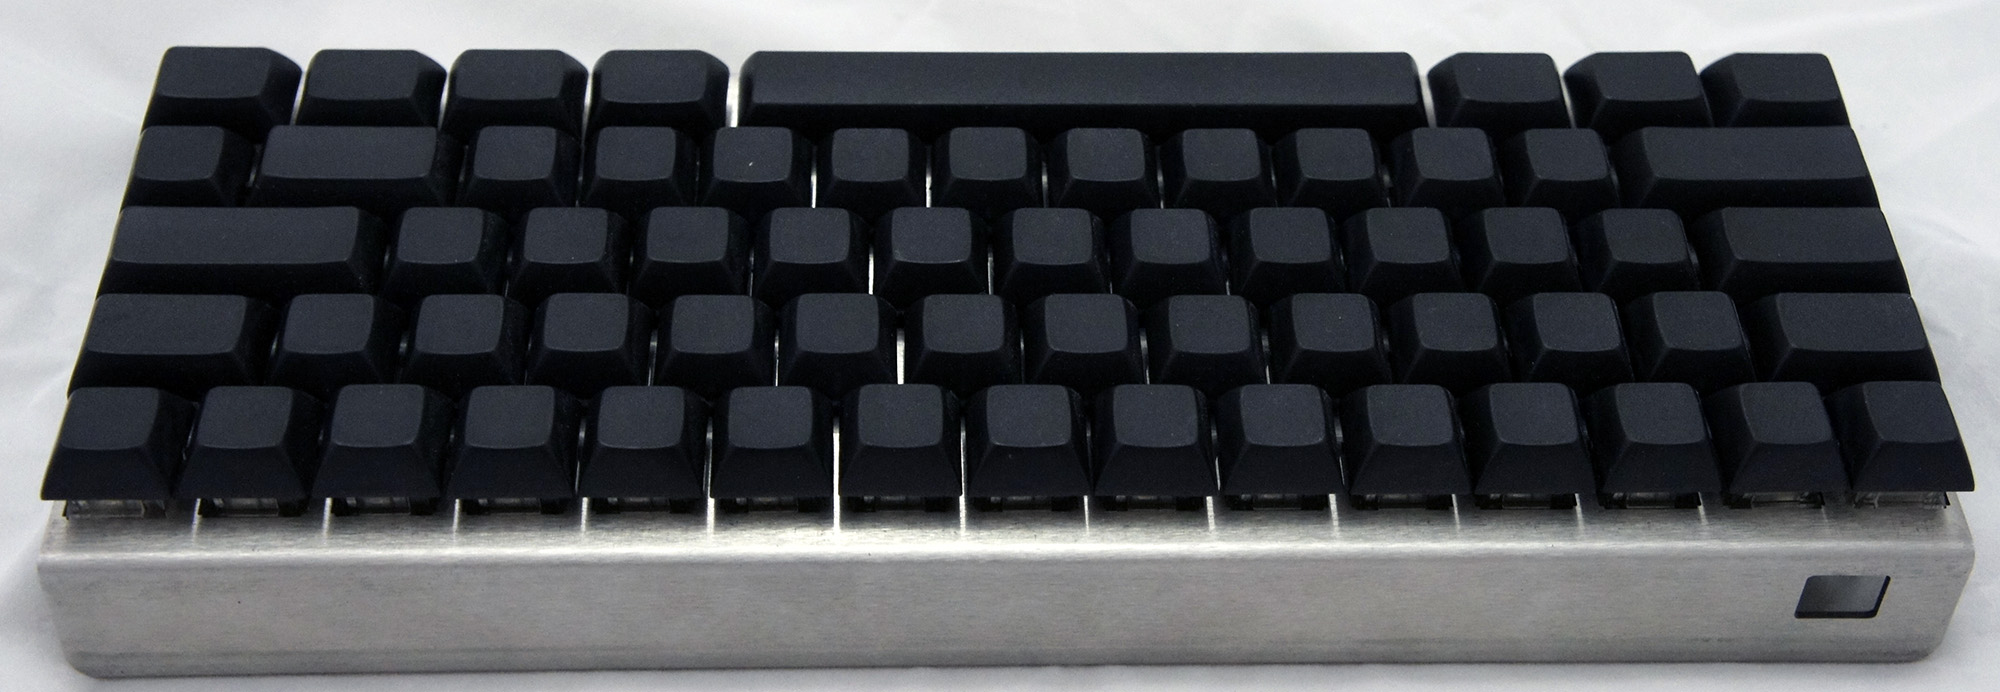
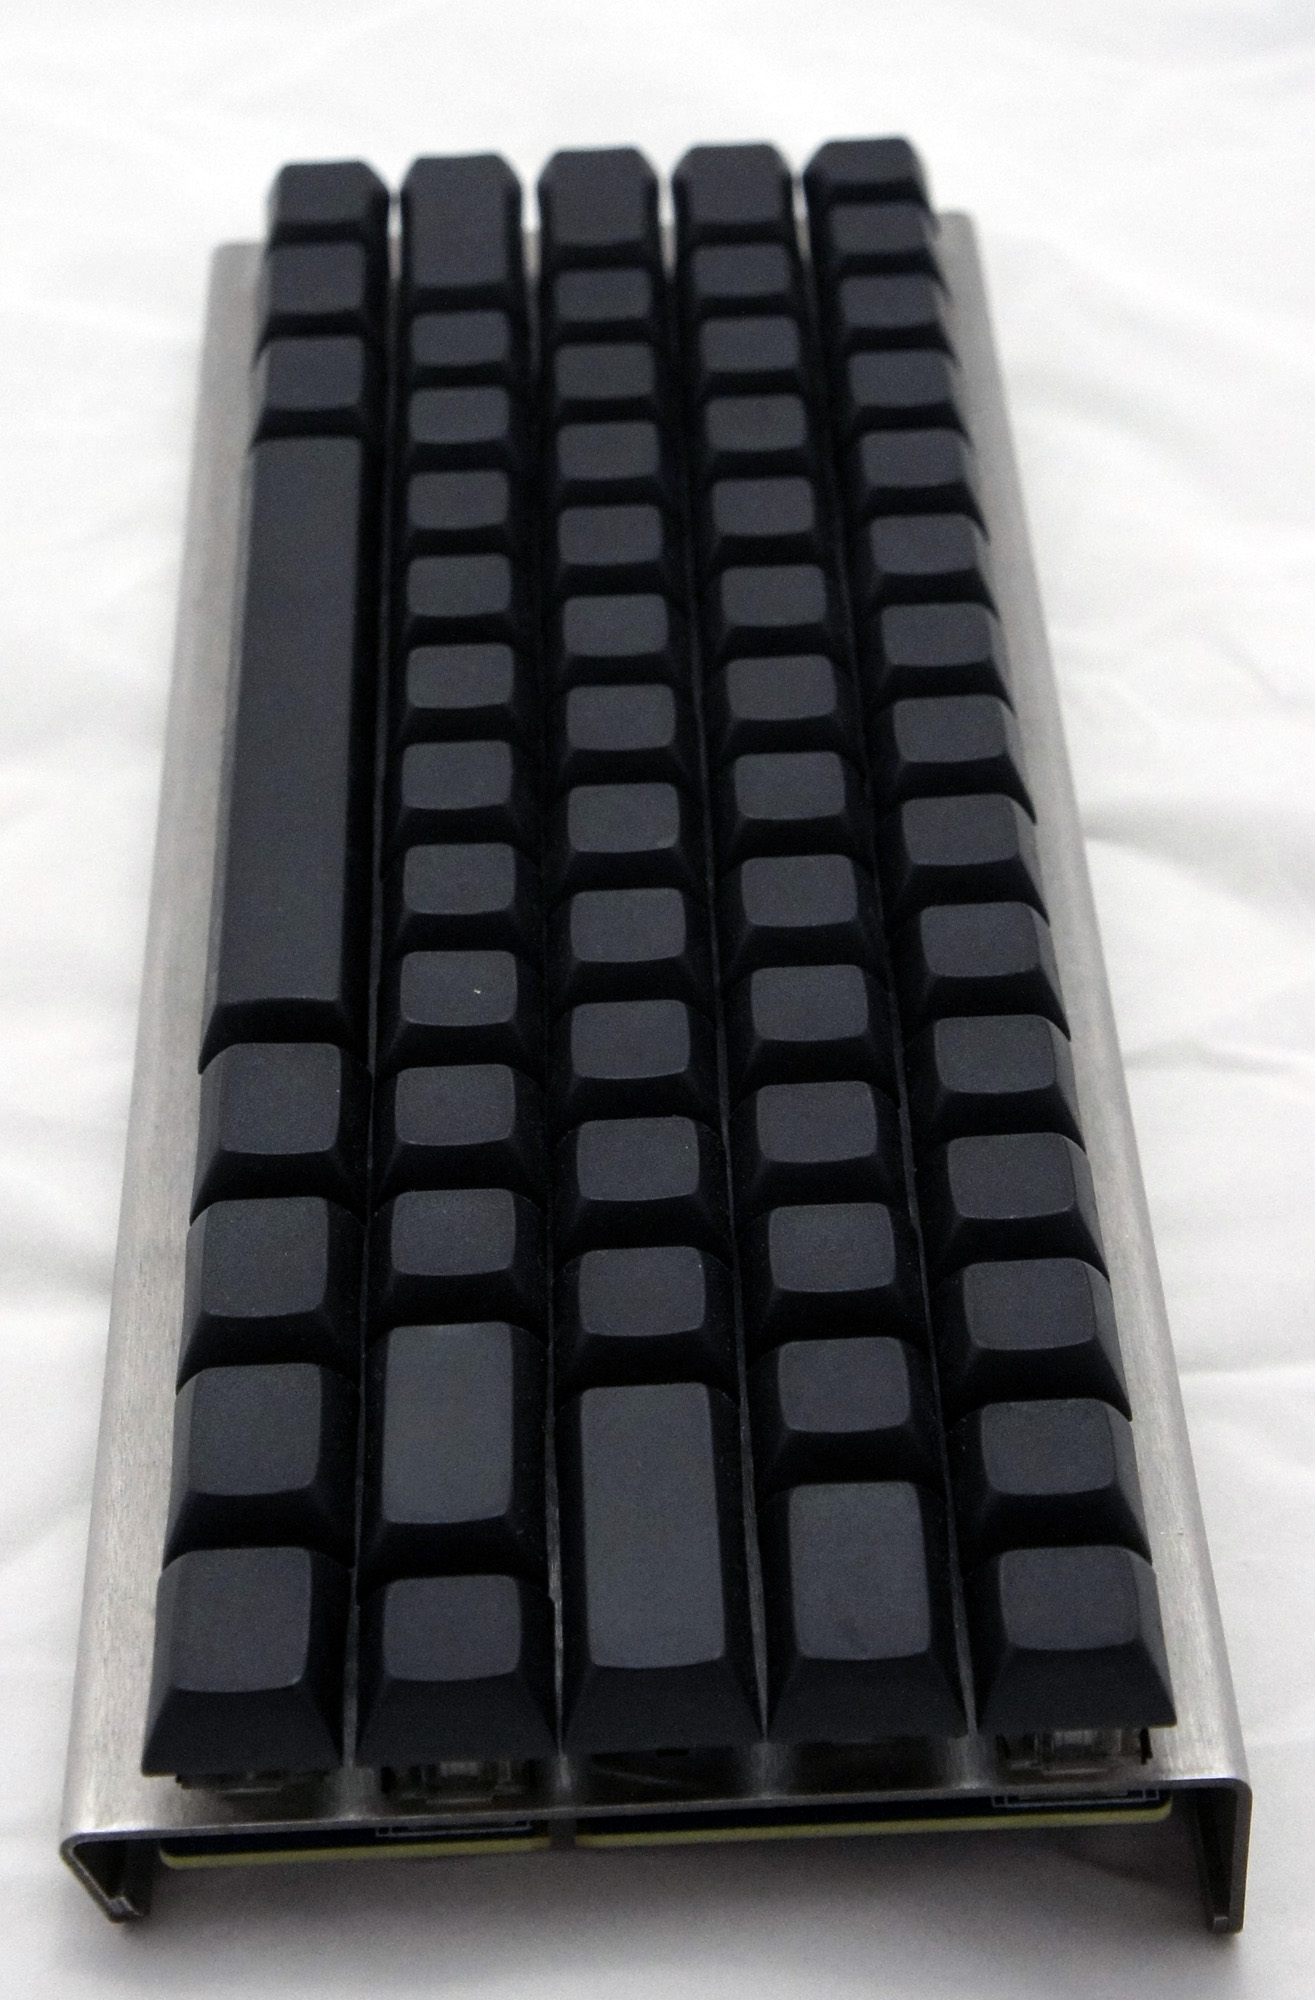
As for the chassis, I stuck with the purpose-built bent metal chassis, since it was designed for the Infinity Keyboard and has a nice industrial look to it.
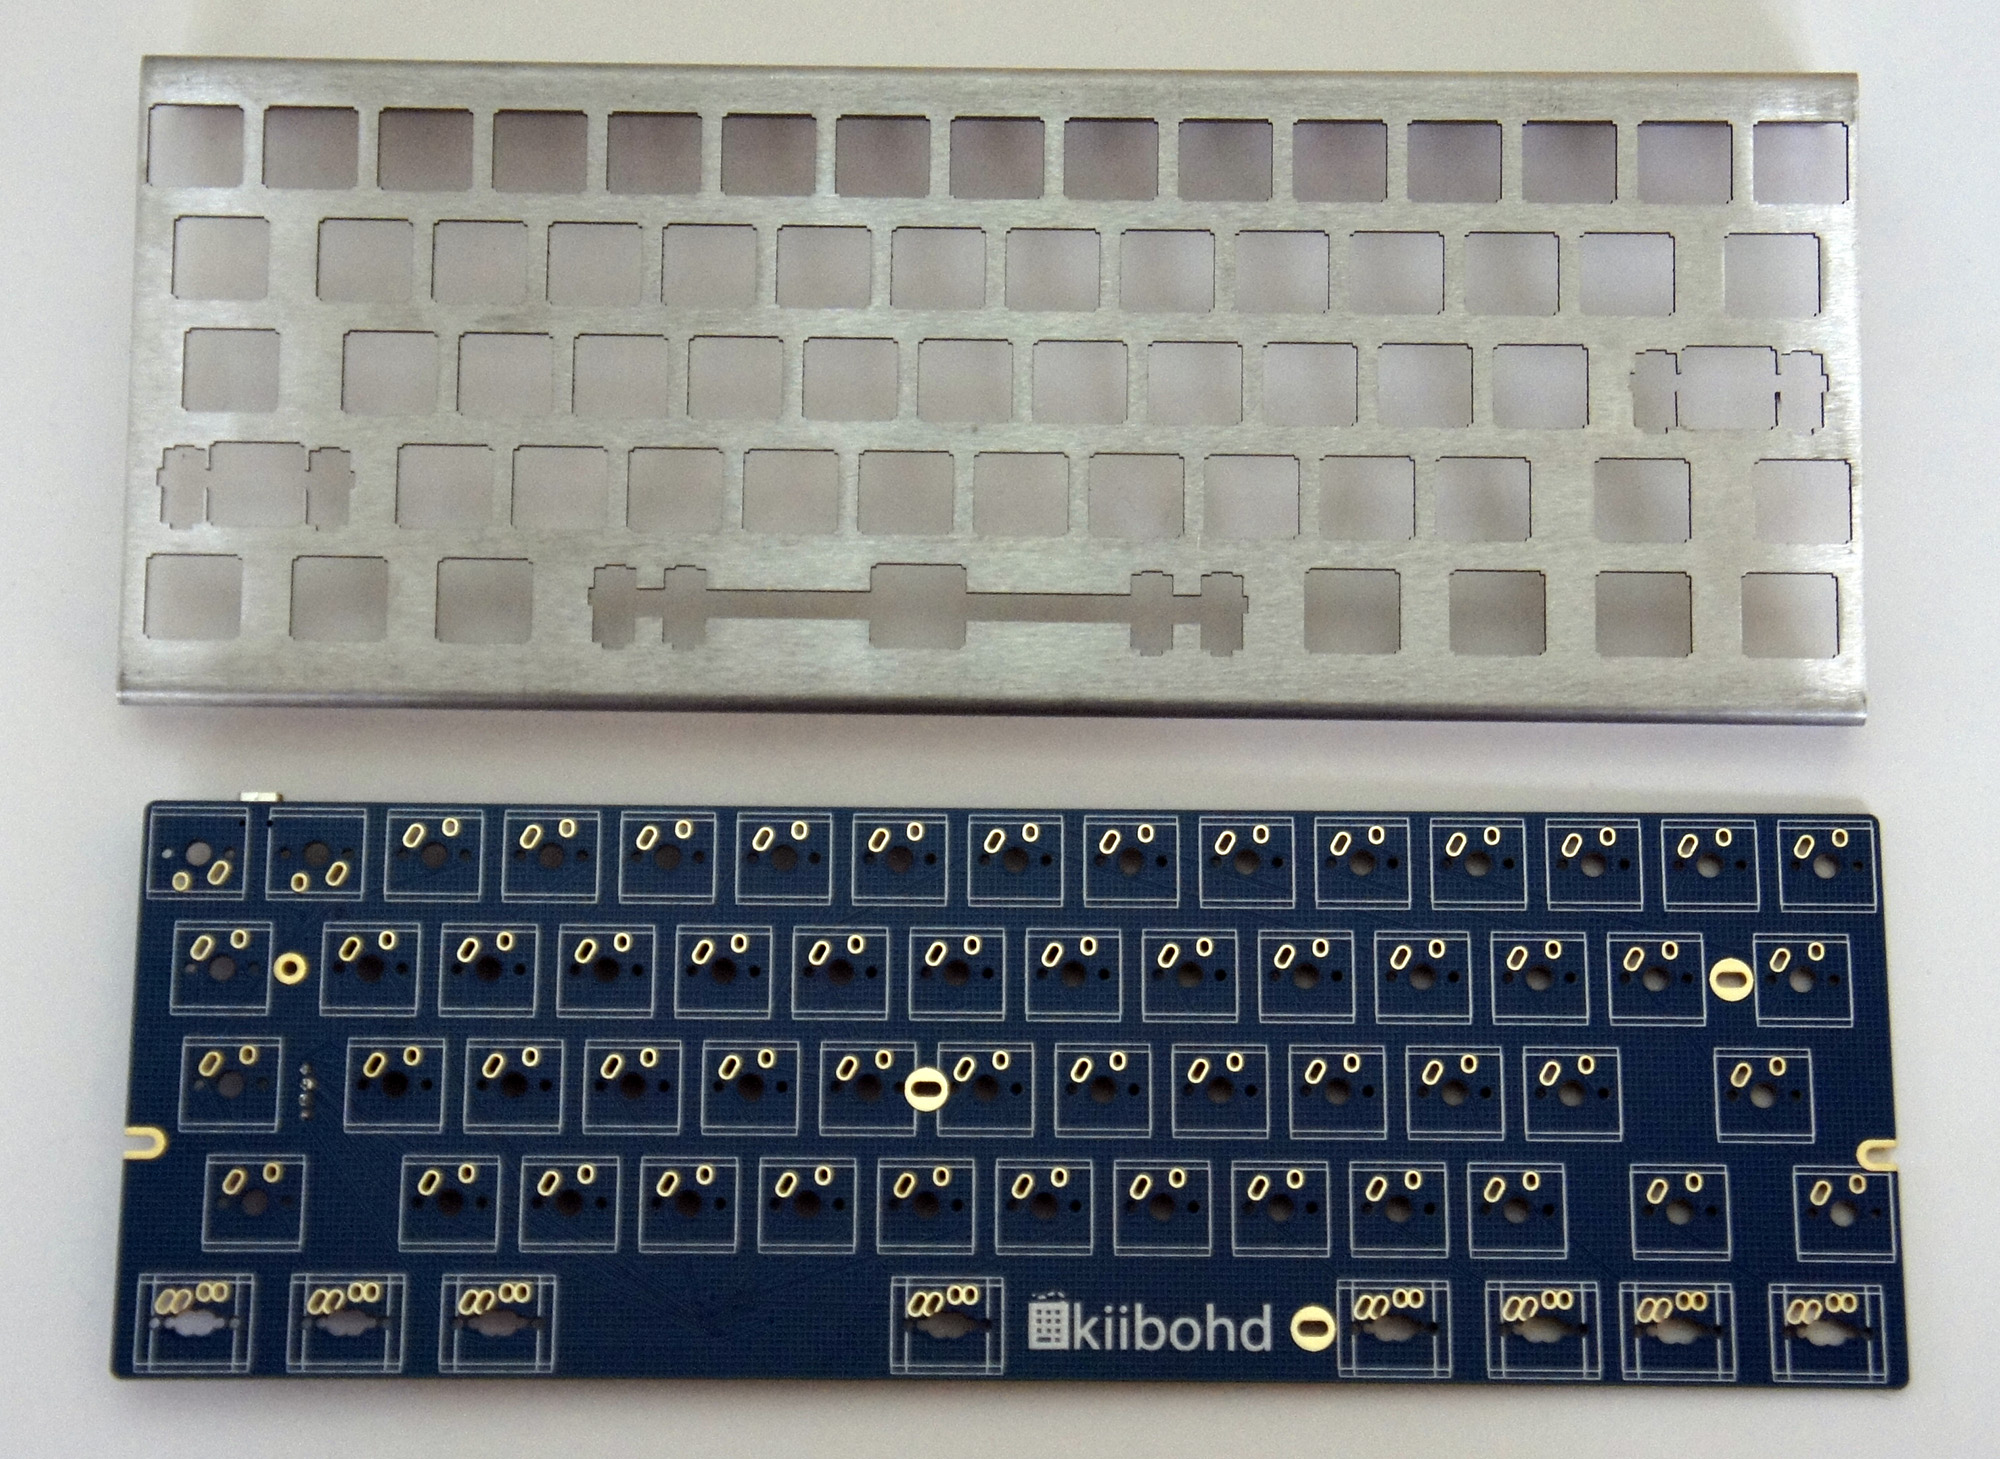
Finally, the logic board used is a custom ‘kiibohd’ (get it? ‘kiibohd’ sounds like a British person saying ‘keyboard’, hilarious), designed to fit both Cherry and Matias Alps switches.
Getting Started
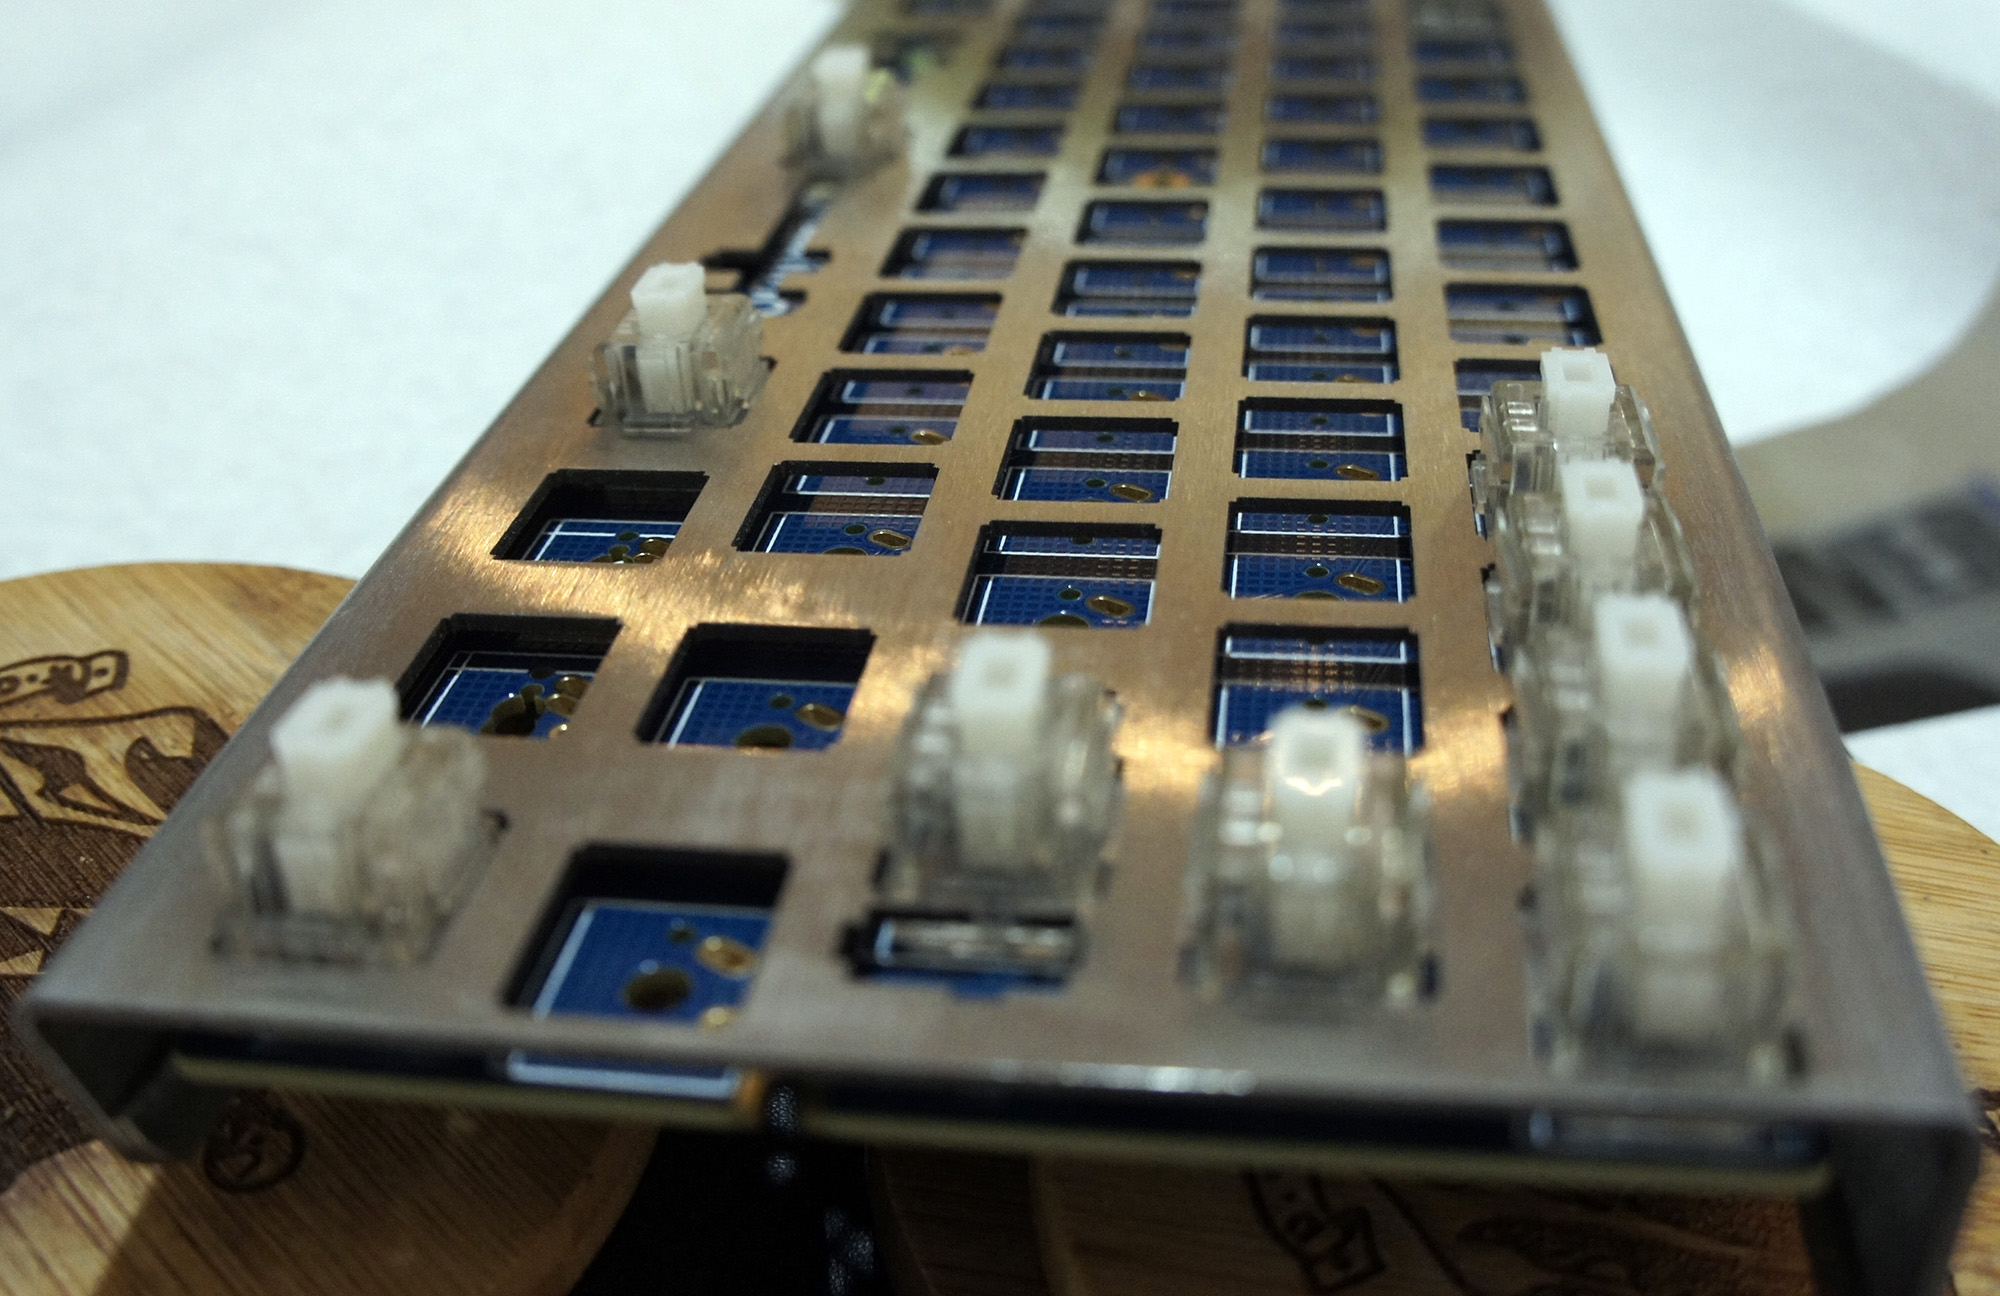
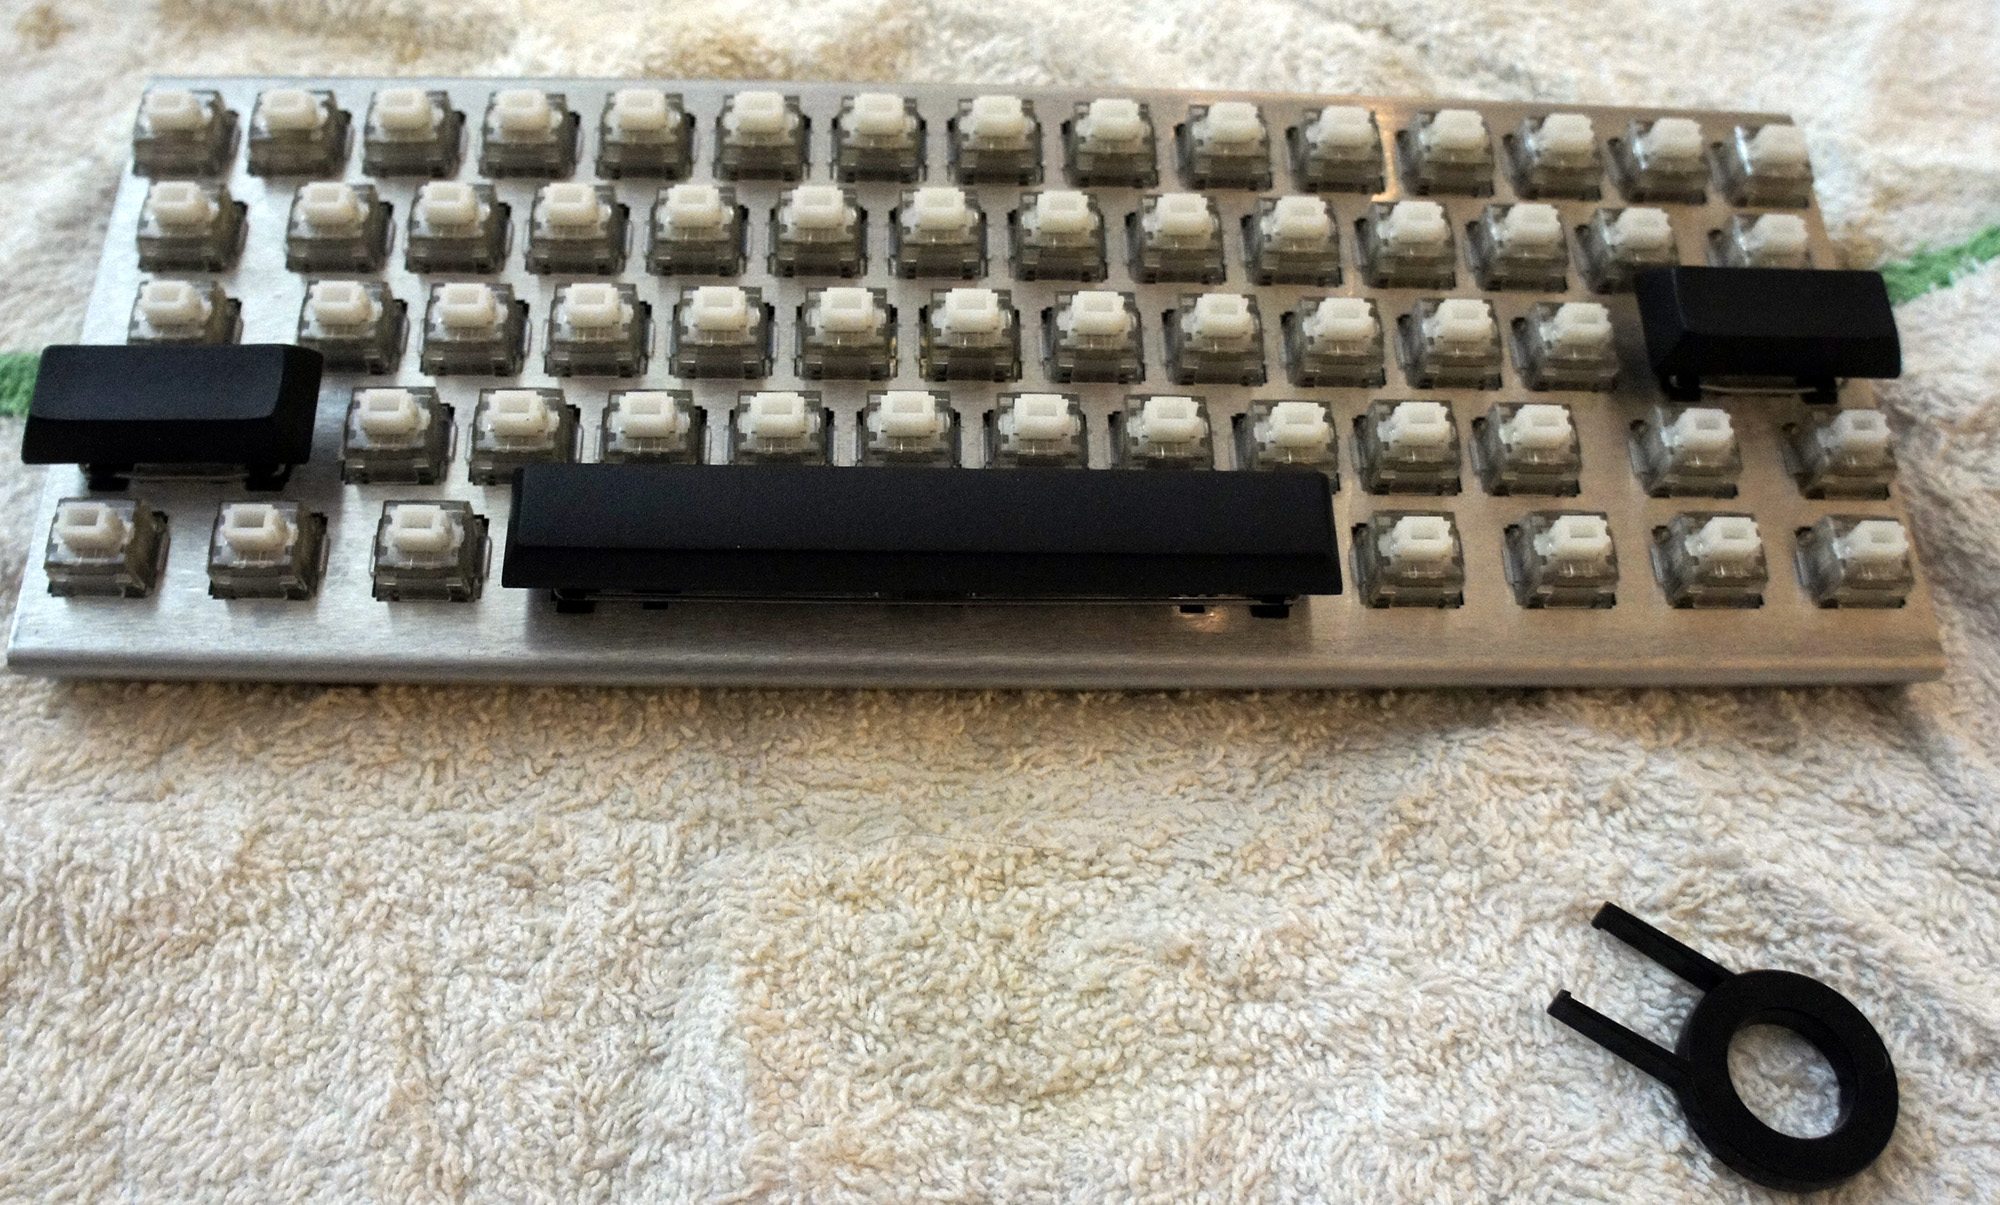
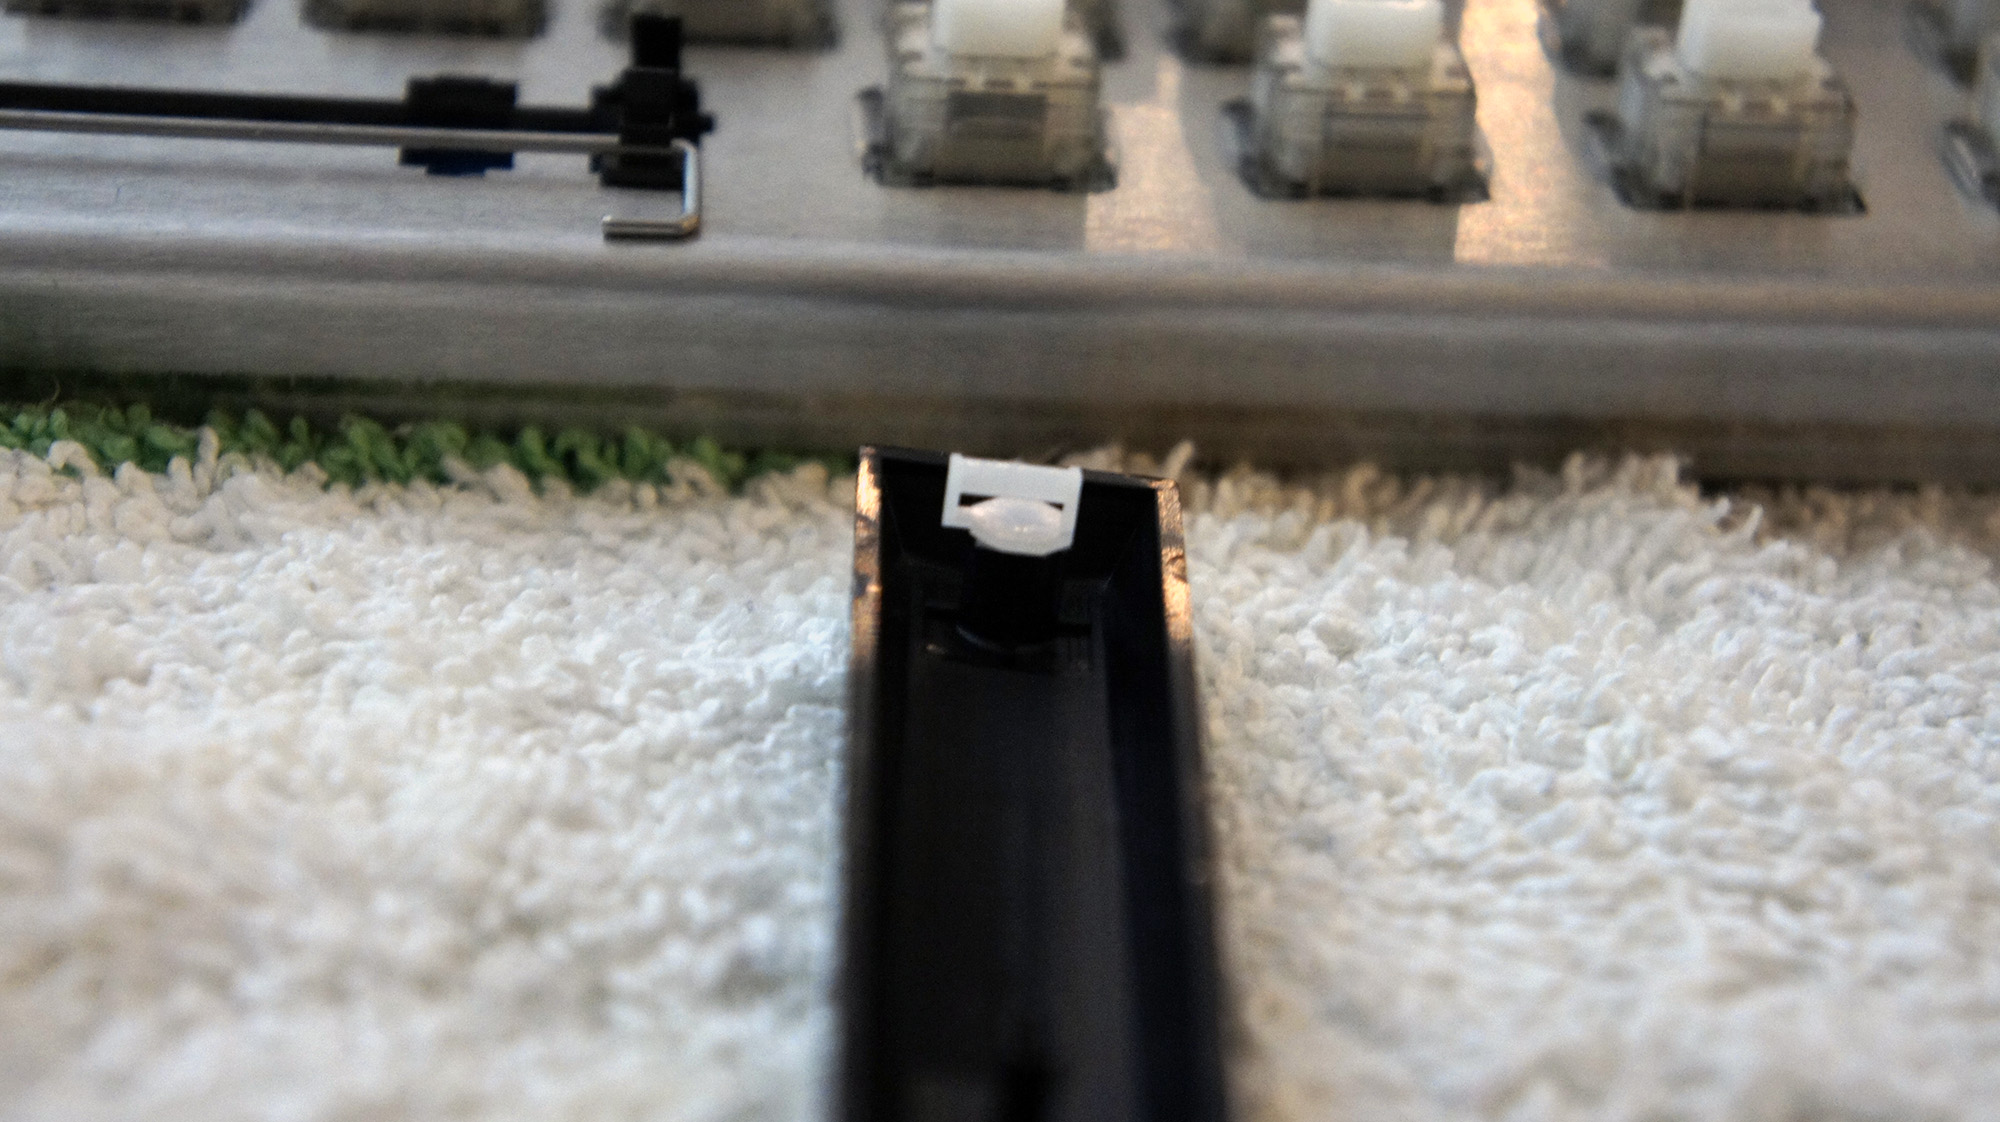
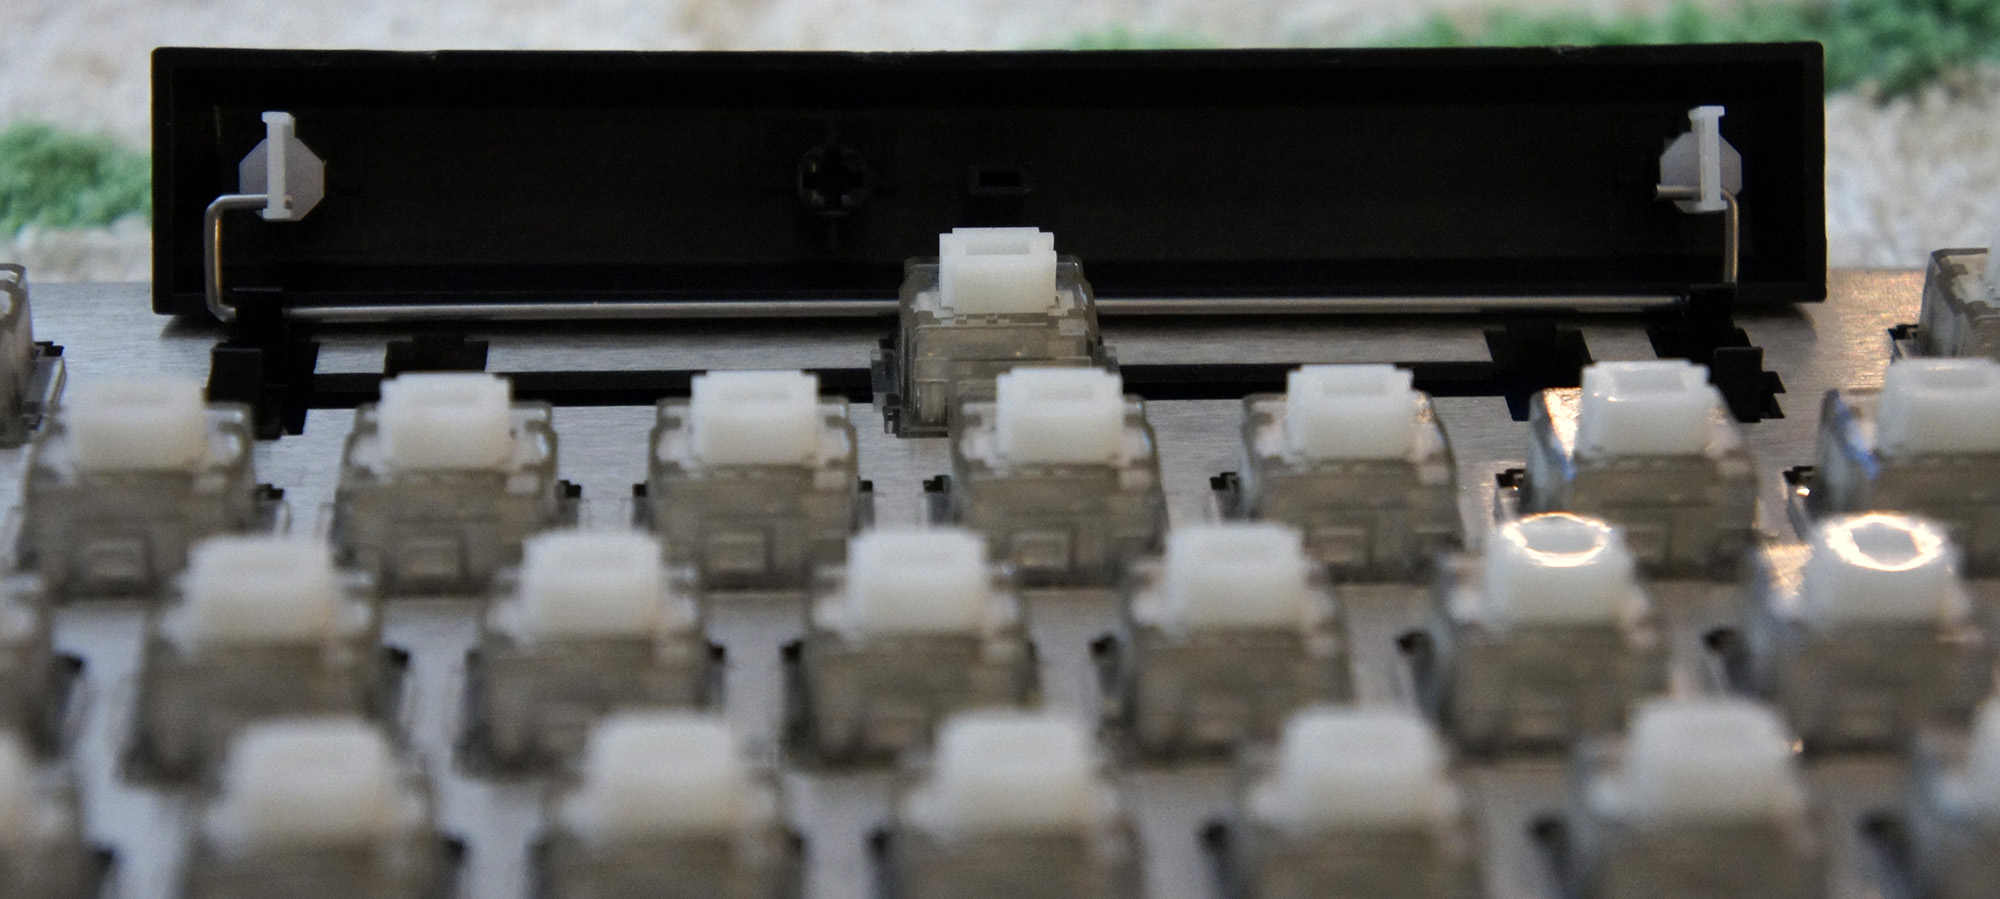
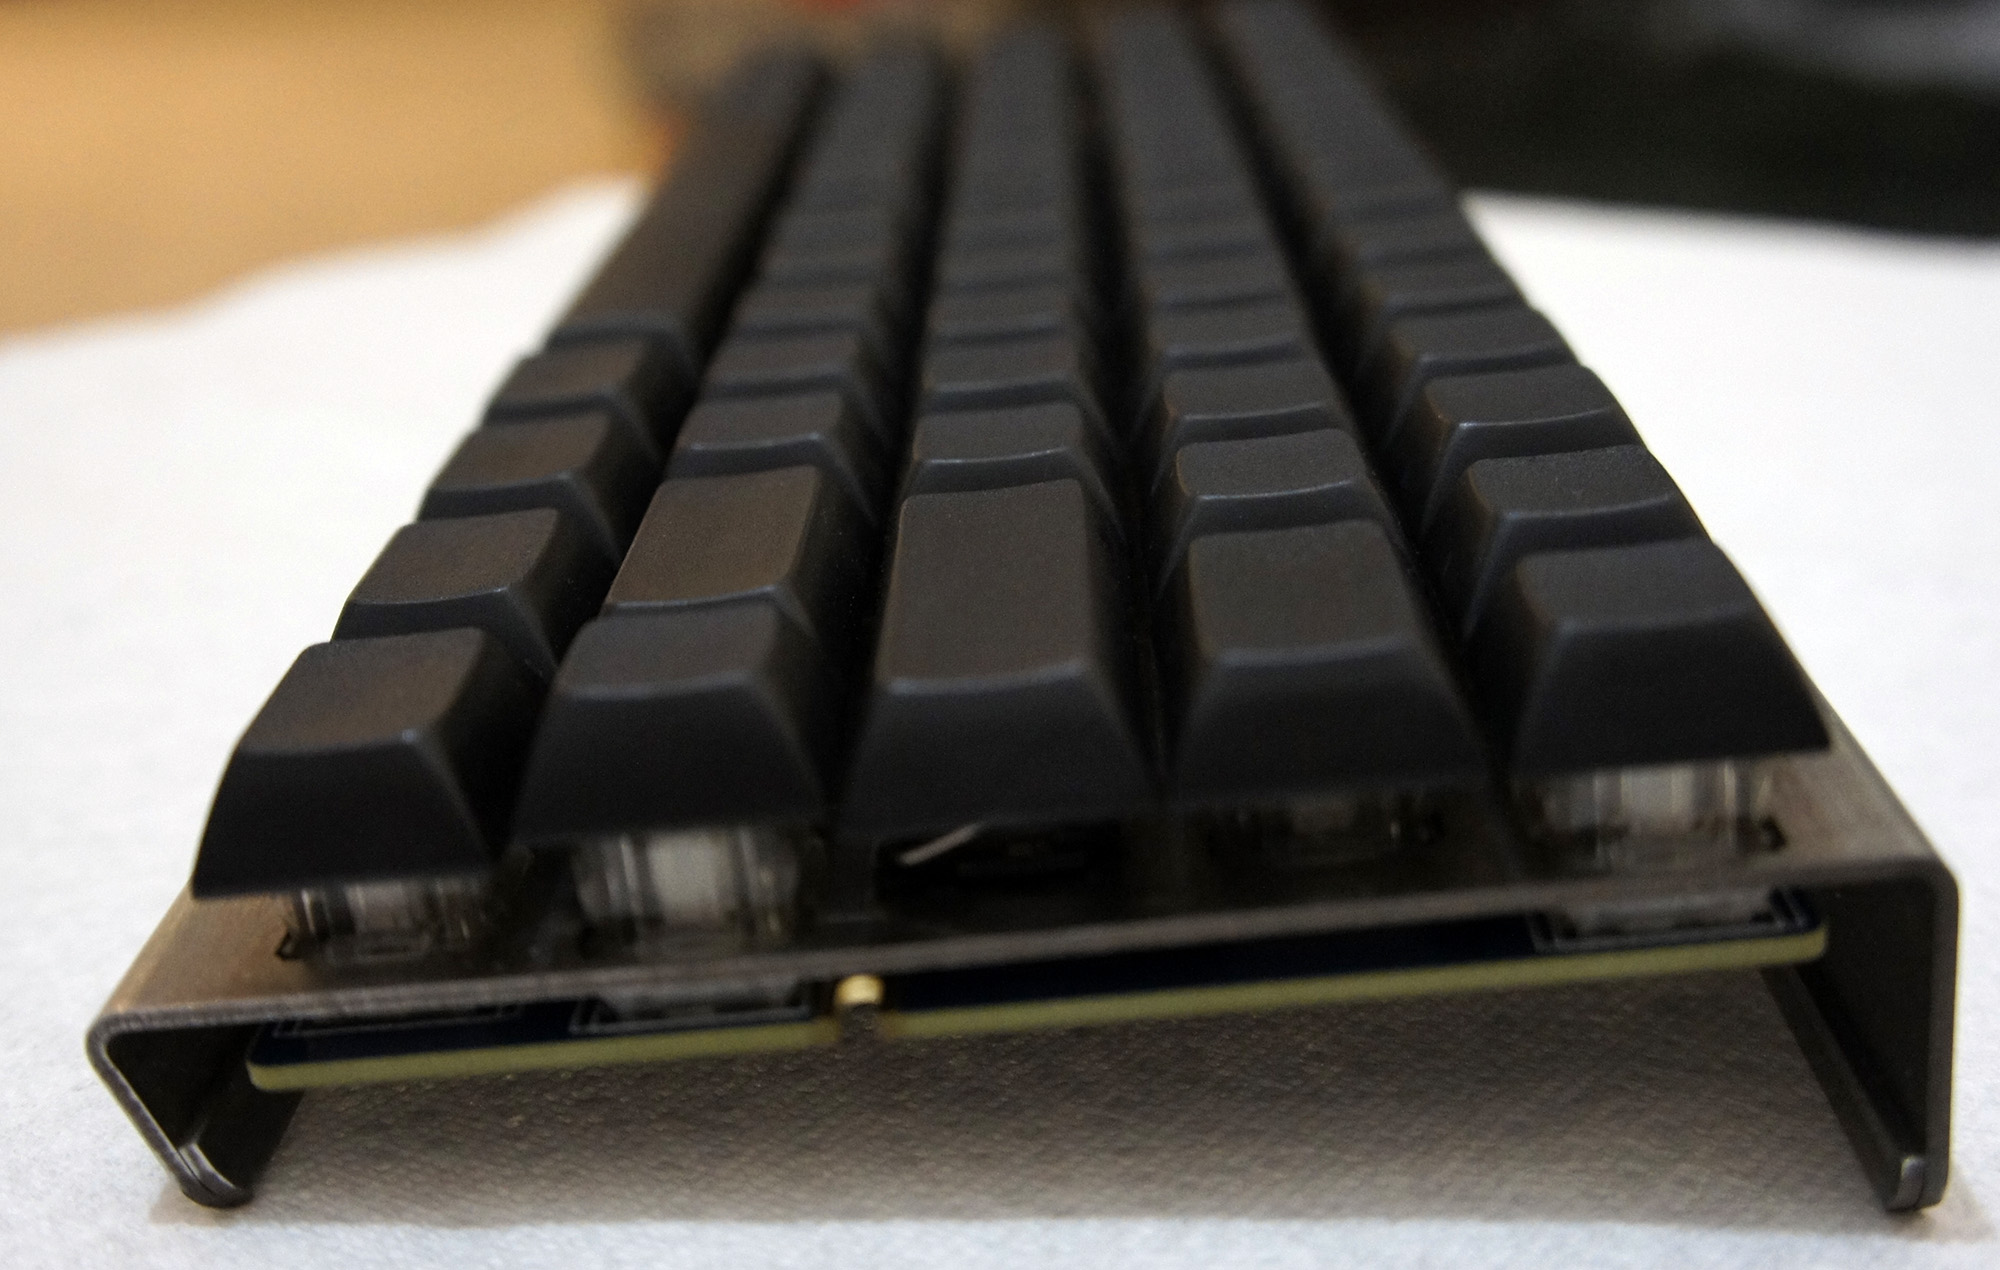
The process began with me putting the switches into the chassis. They went in from the top side of the keyboard, and the switches had to be pushed in until the little wings on the sides of the switches popped out on the bottom side of the keyboard. I could tell when they were in place because the plastic stoppers were flush against the metal of the chassis.
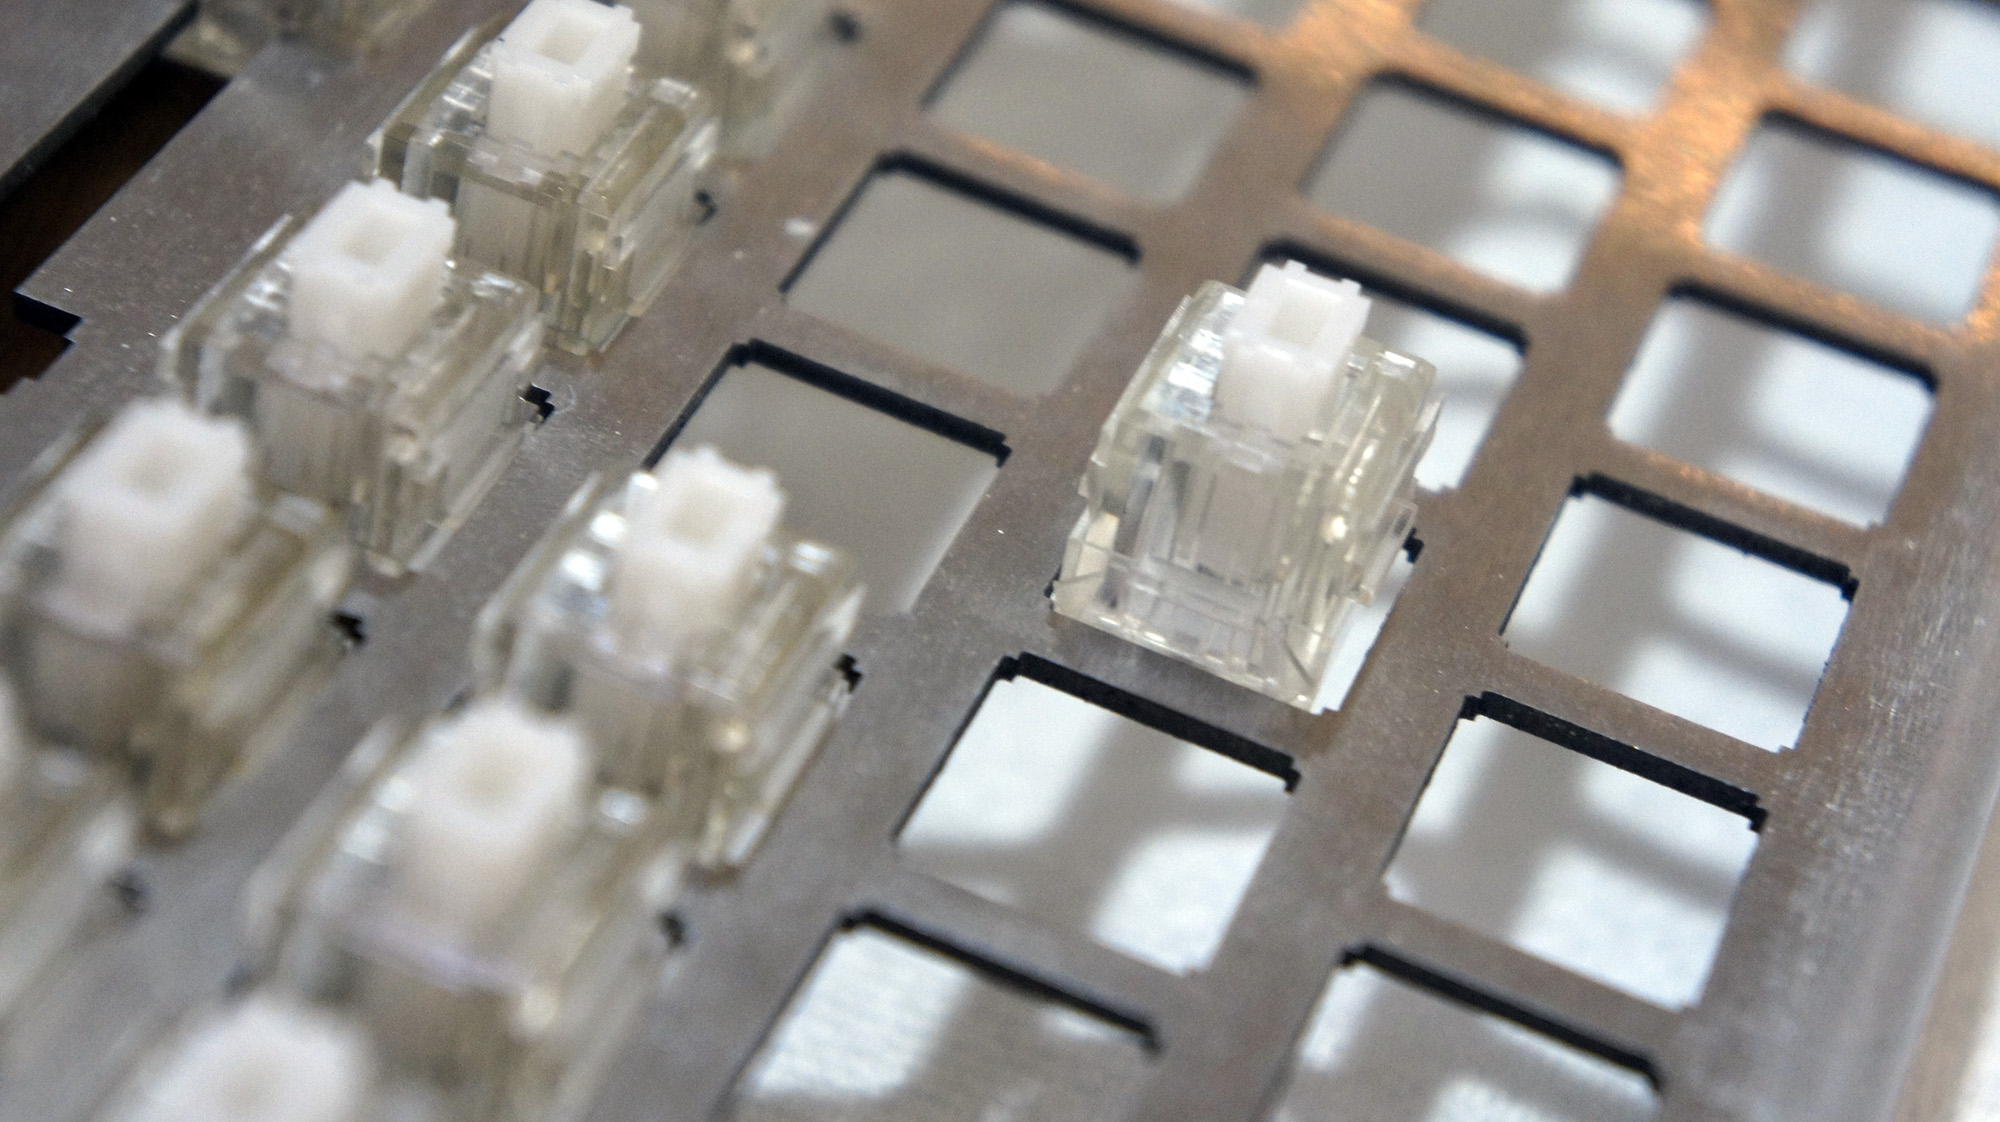
I made the silly mistake of putting in all the switches prior to sticking the logic board on. Unfortunately, this meant that lining up all the holes would be impossible, so I took the advice of someone on the Massdrop discussion and popped out all the key switches until I only had a couple in each corner. This made it easy to line up and stick on the board.
Once the board was in place, I began the process of sticking in the rest of the switches anew.

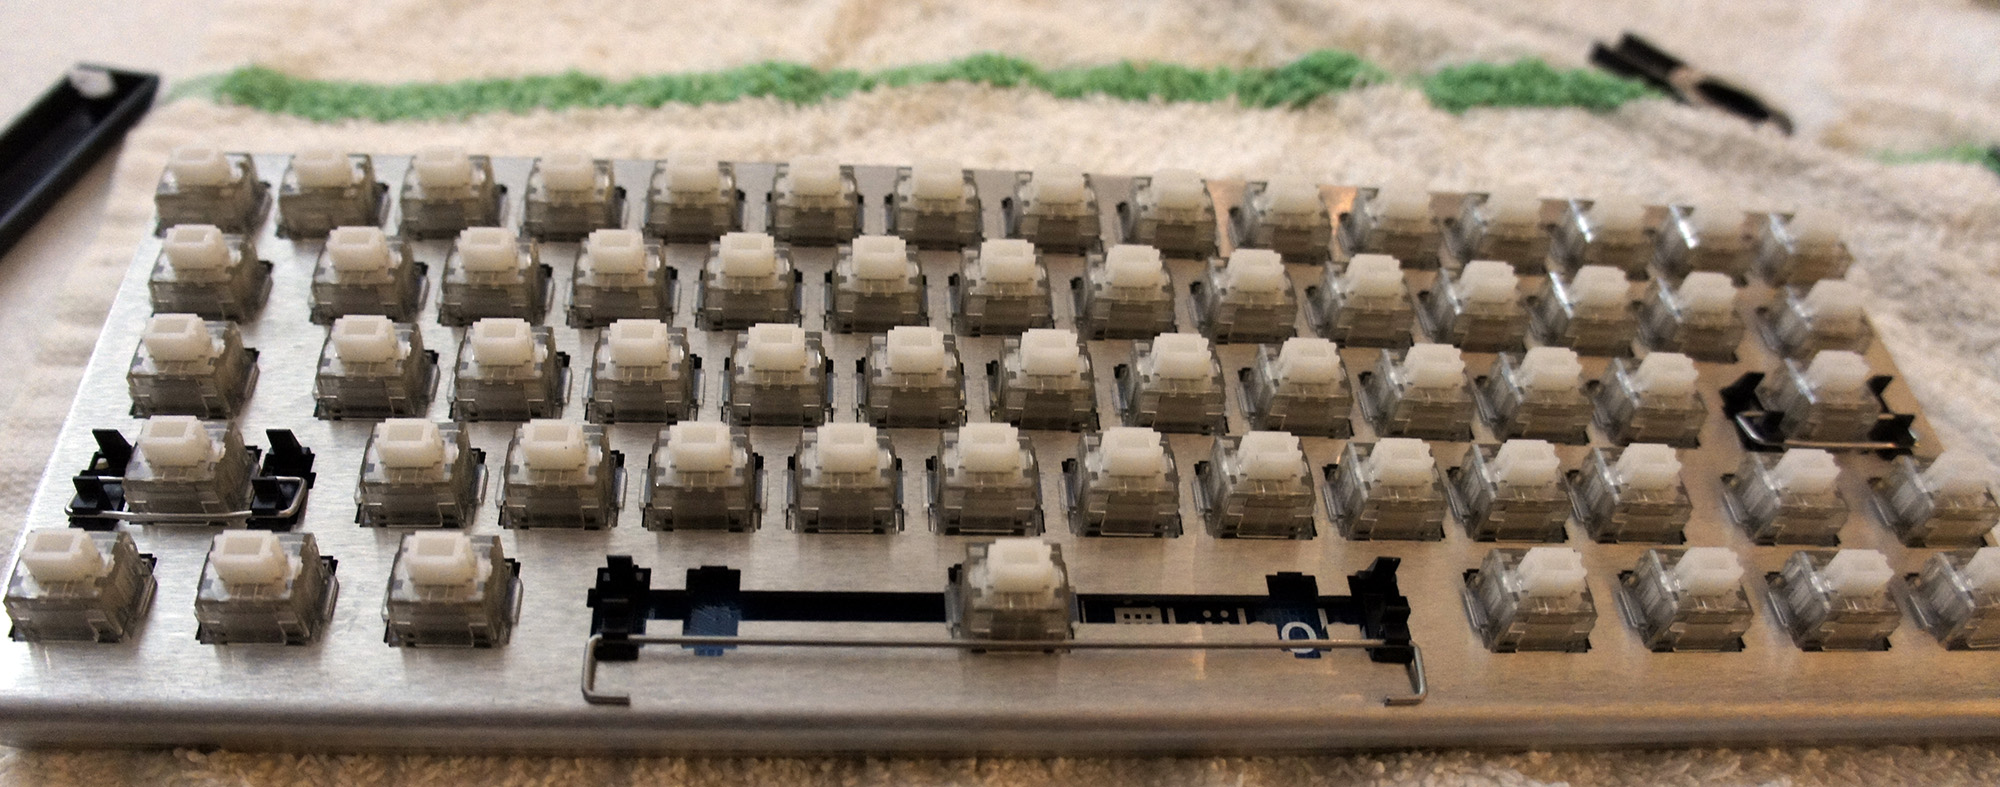
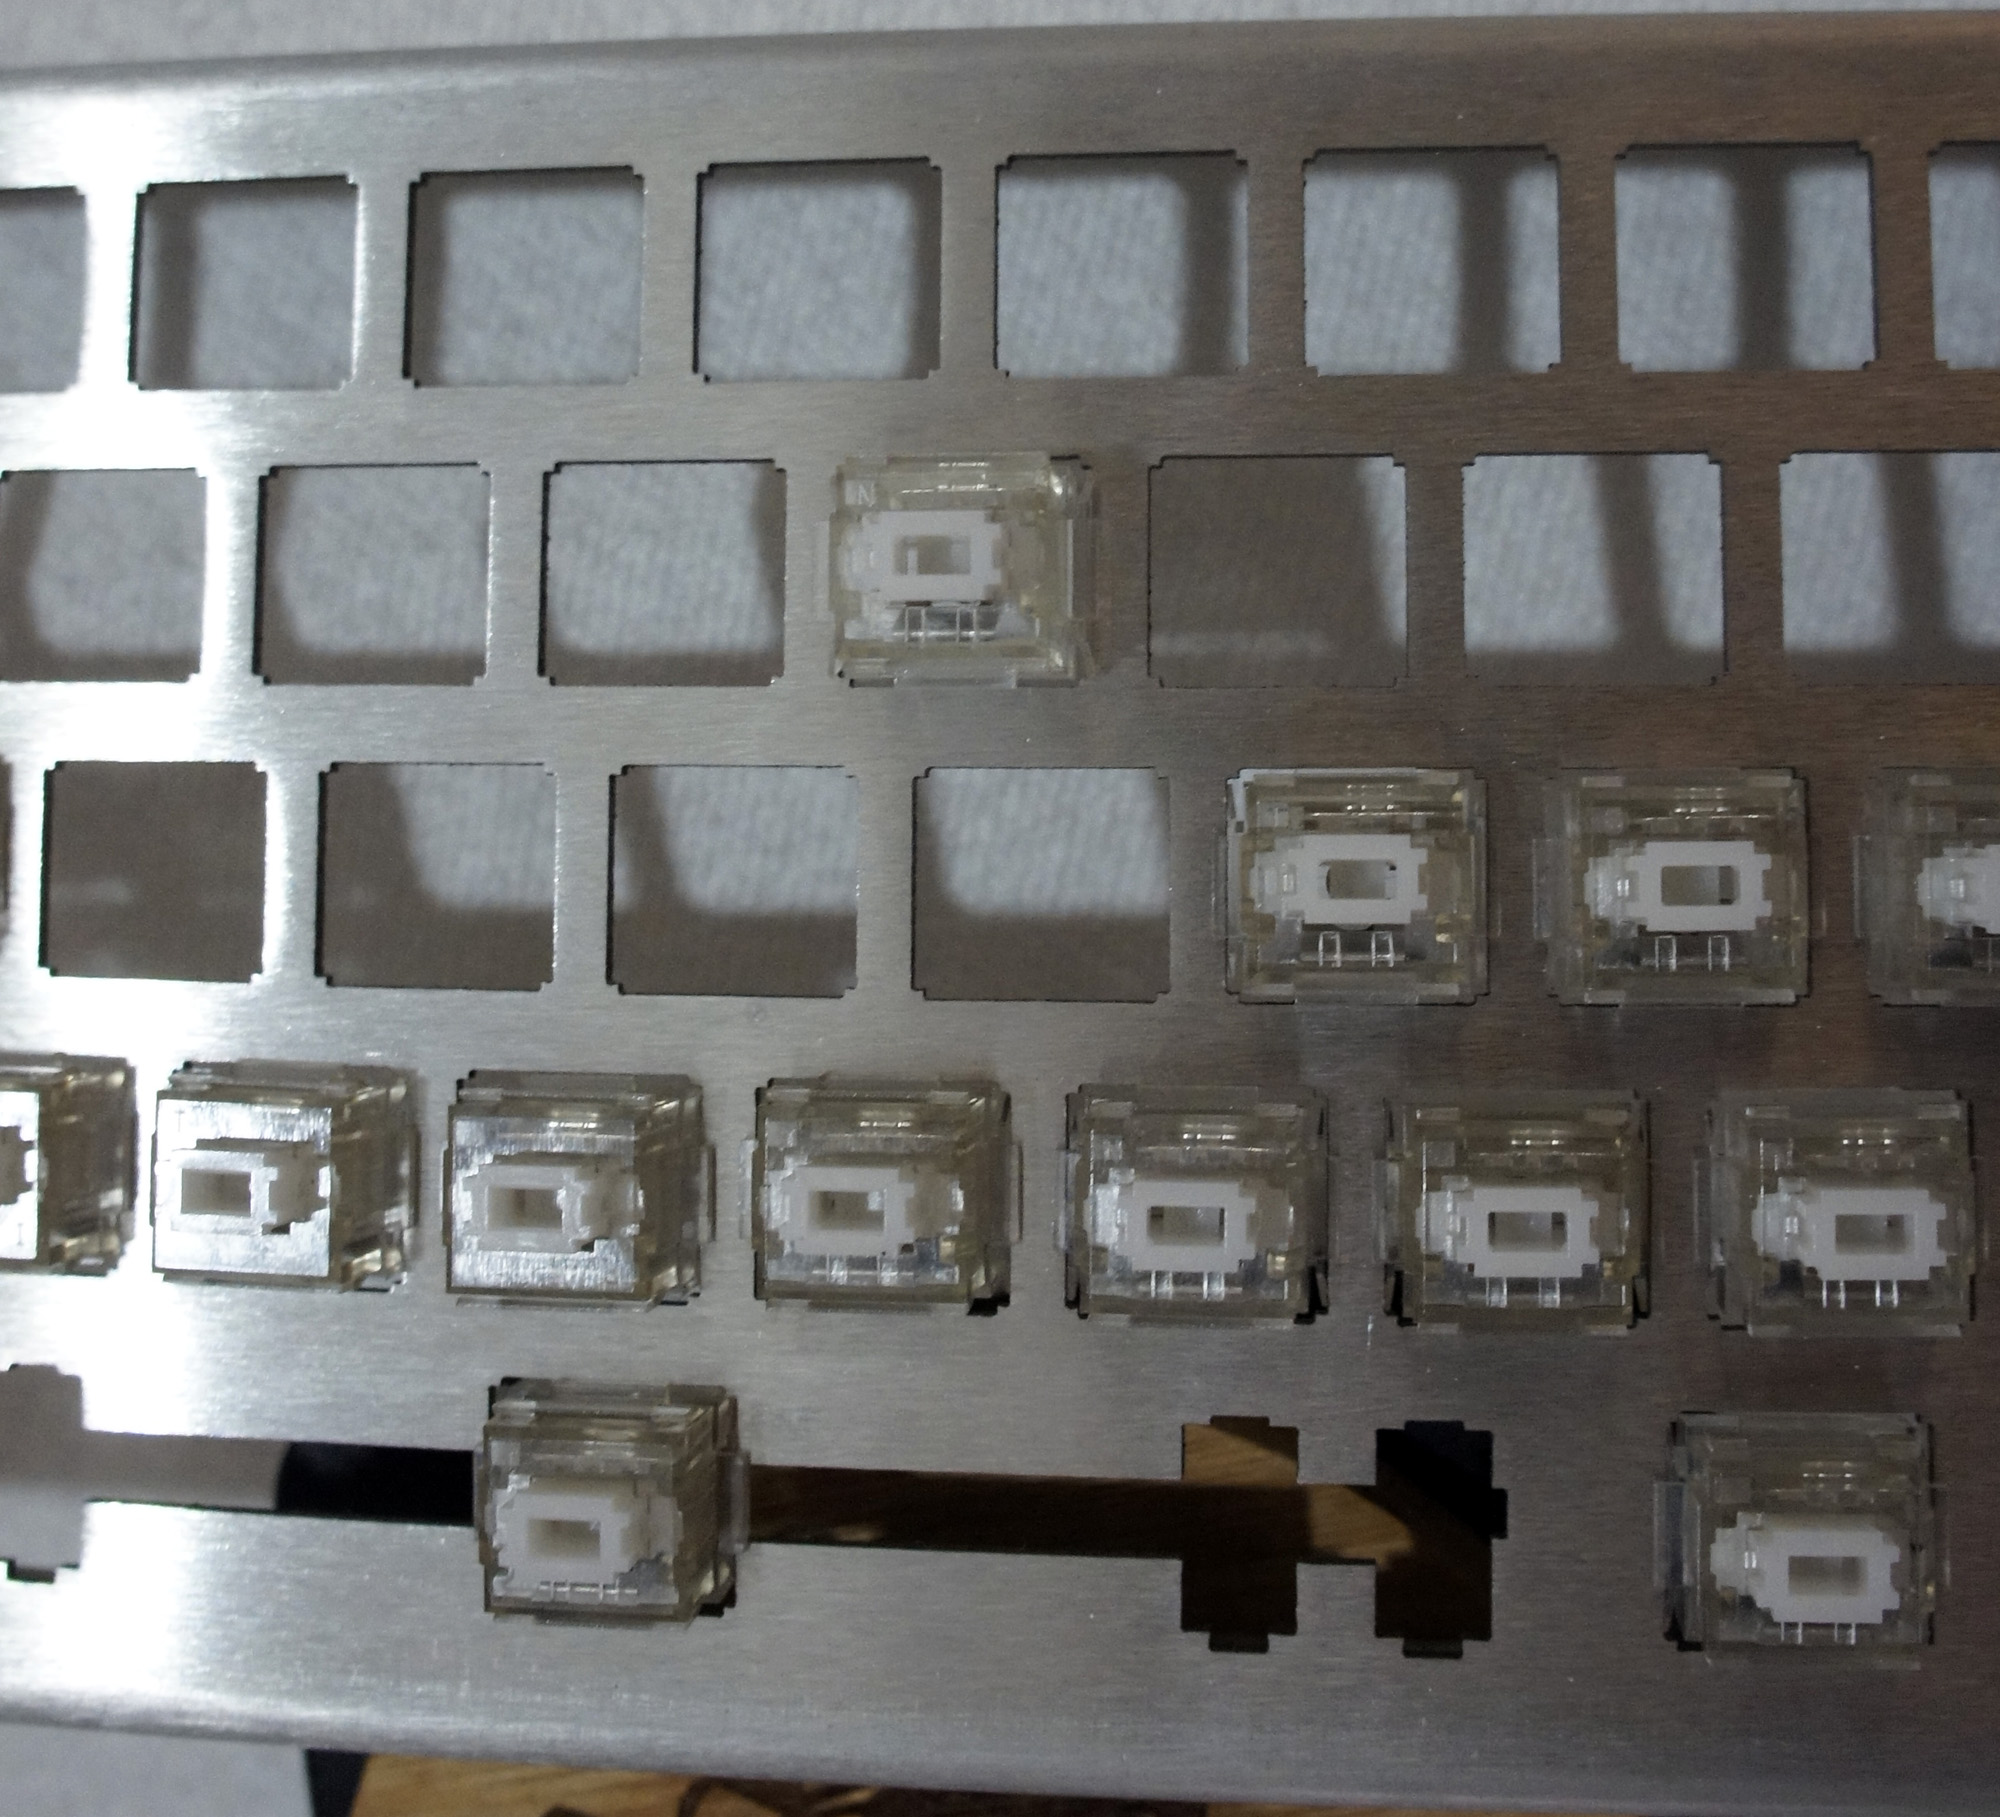
Soldering
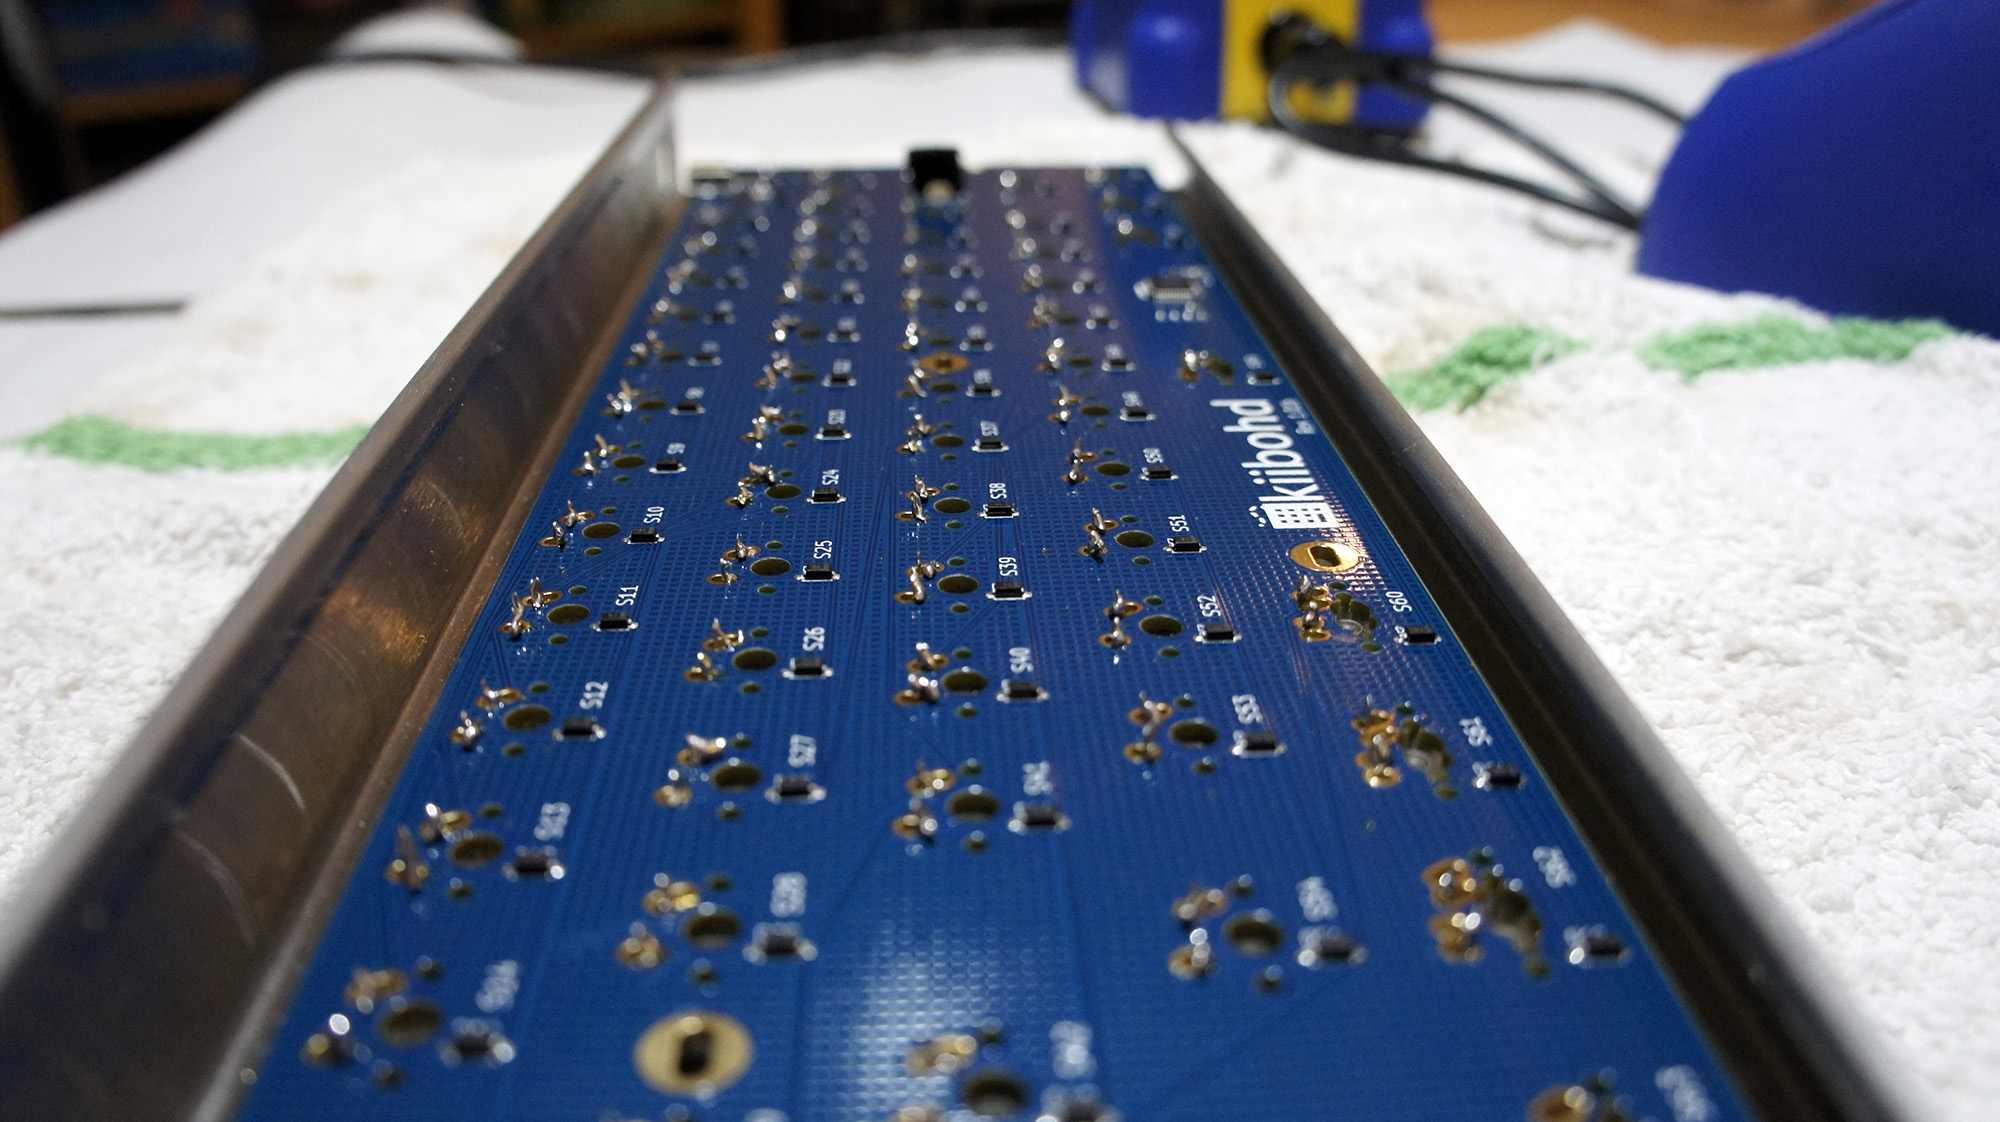
The next step was soldering the switches to the board. This was probably the most daunting task to me, since I hadn’t soldered anything in approximately 10 years; the last time was in early high school, and I was hardly an expert back then.
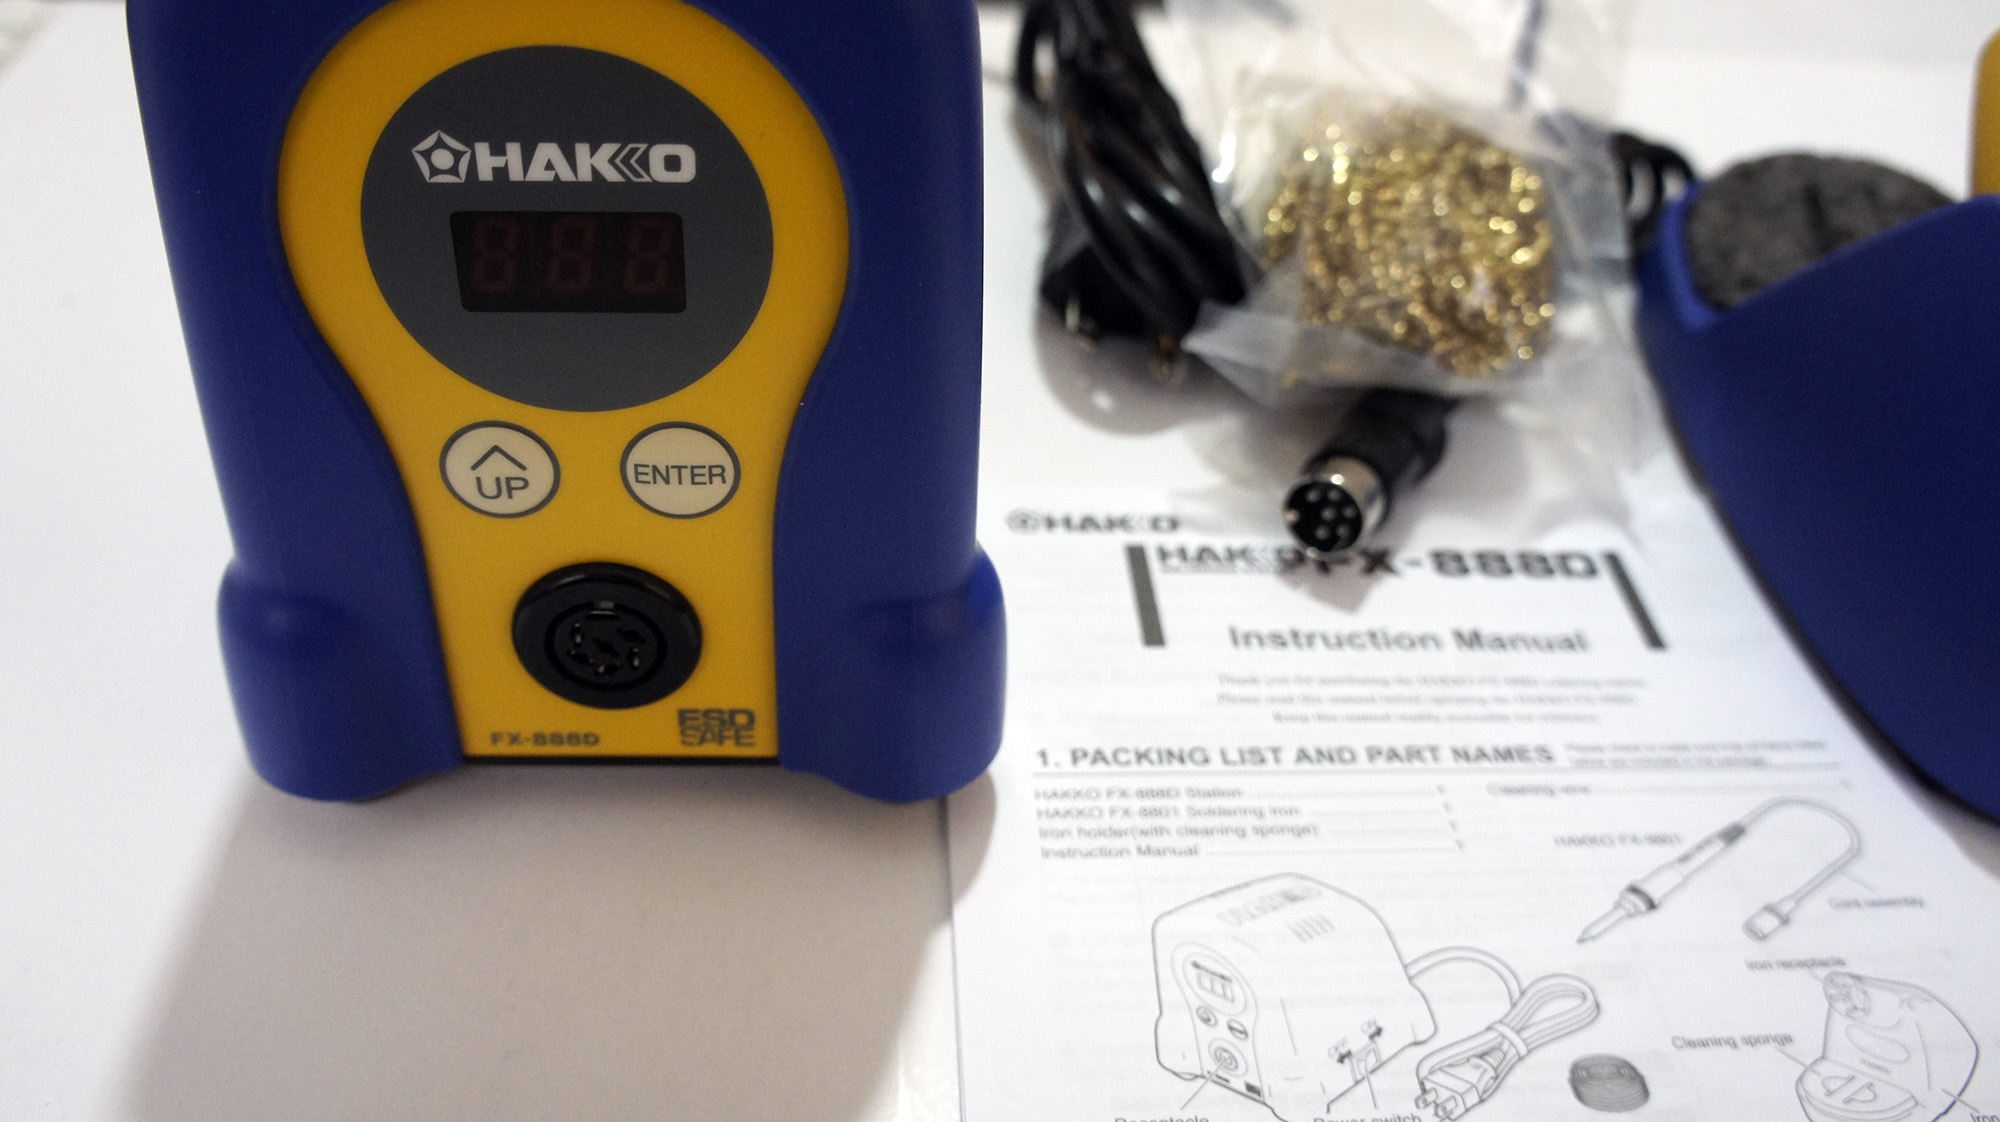
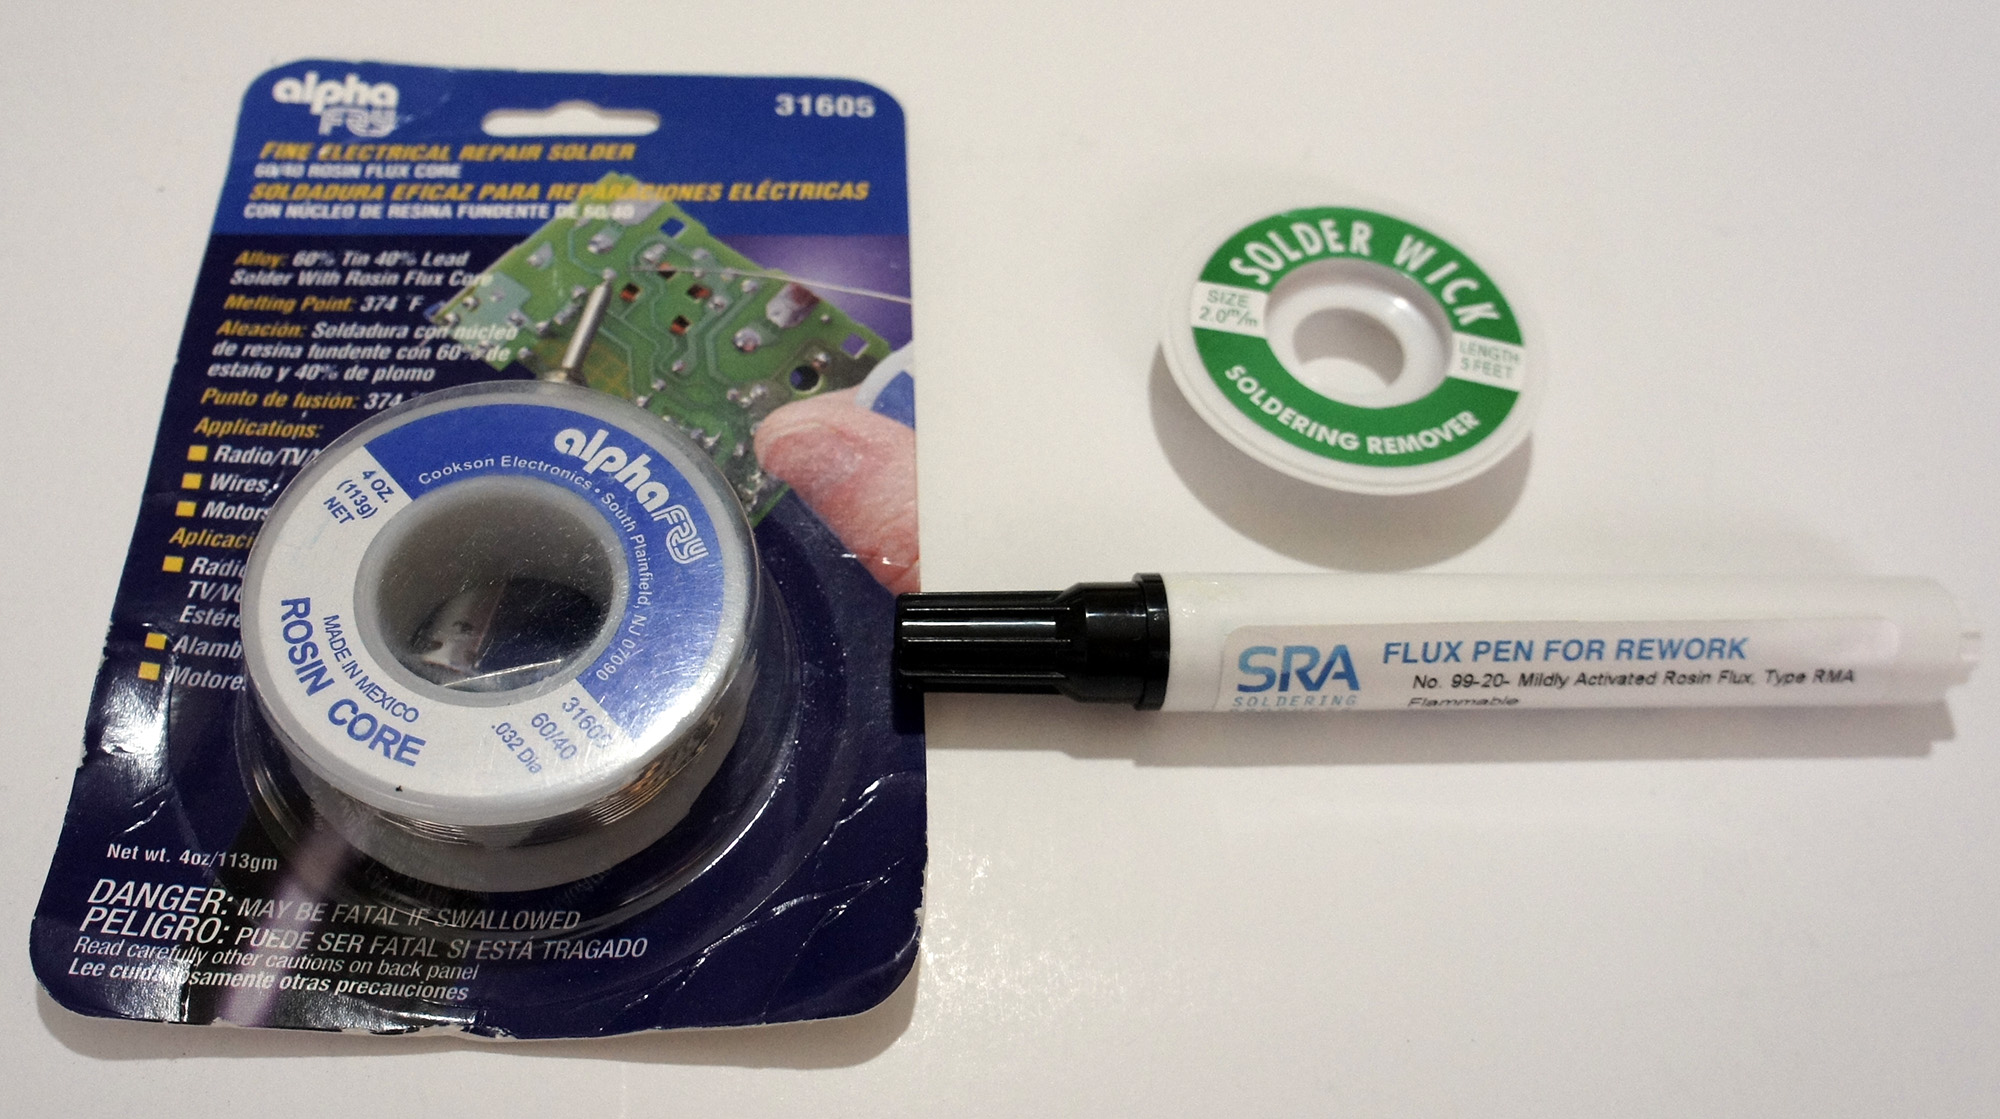
For my soldering kit, I picked up a Hakko FX-888D, since reviews for it are exceptional and a large portion of the internet seems to recommend it.
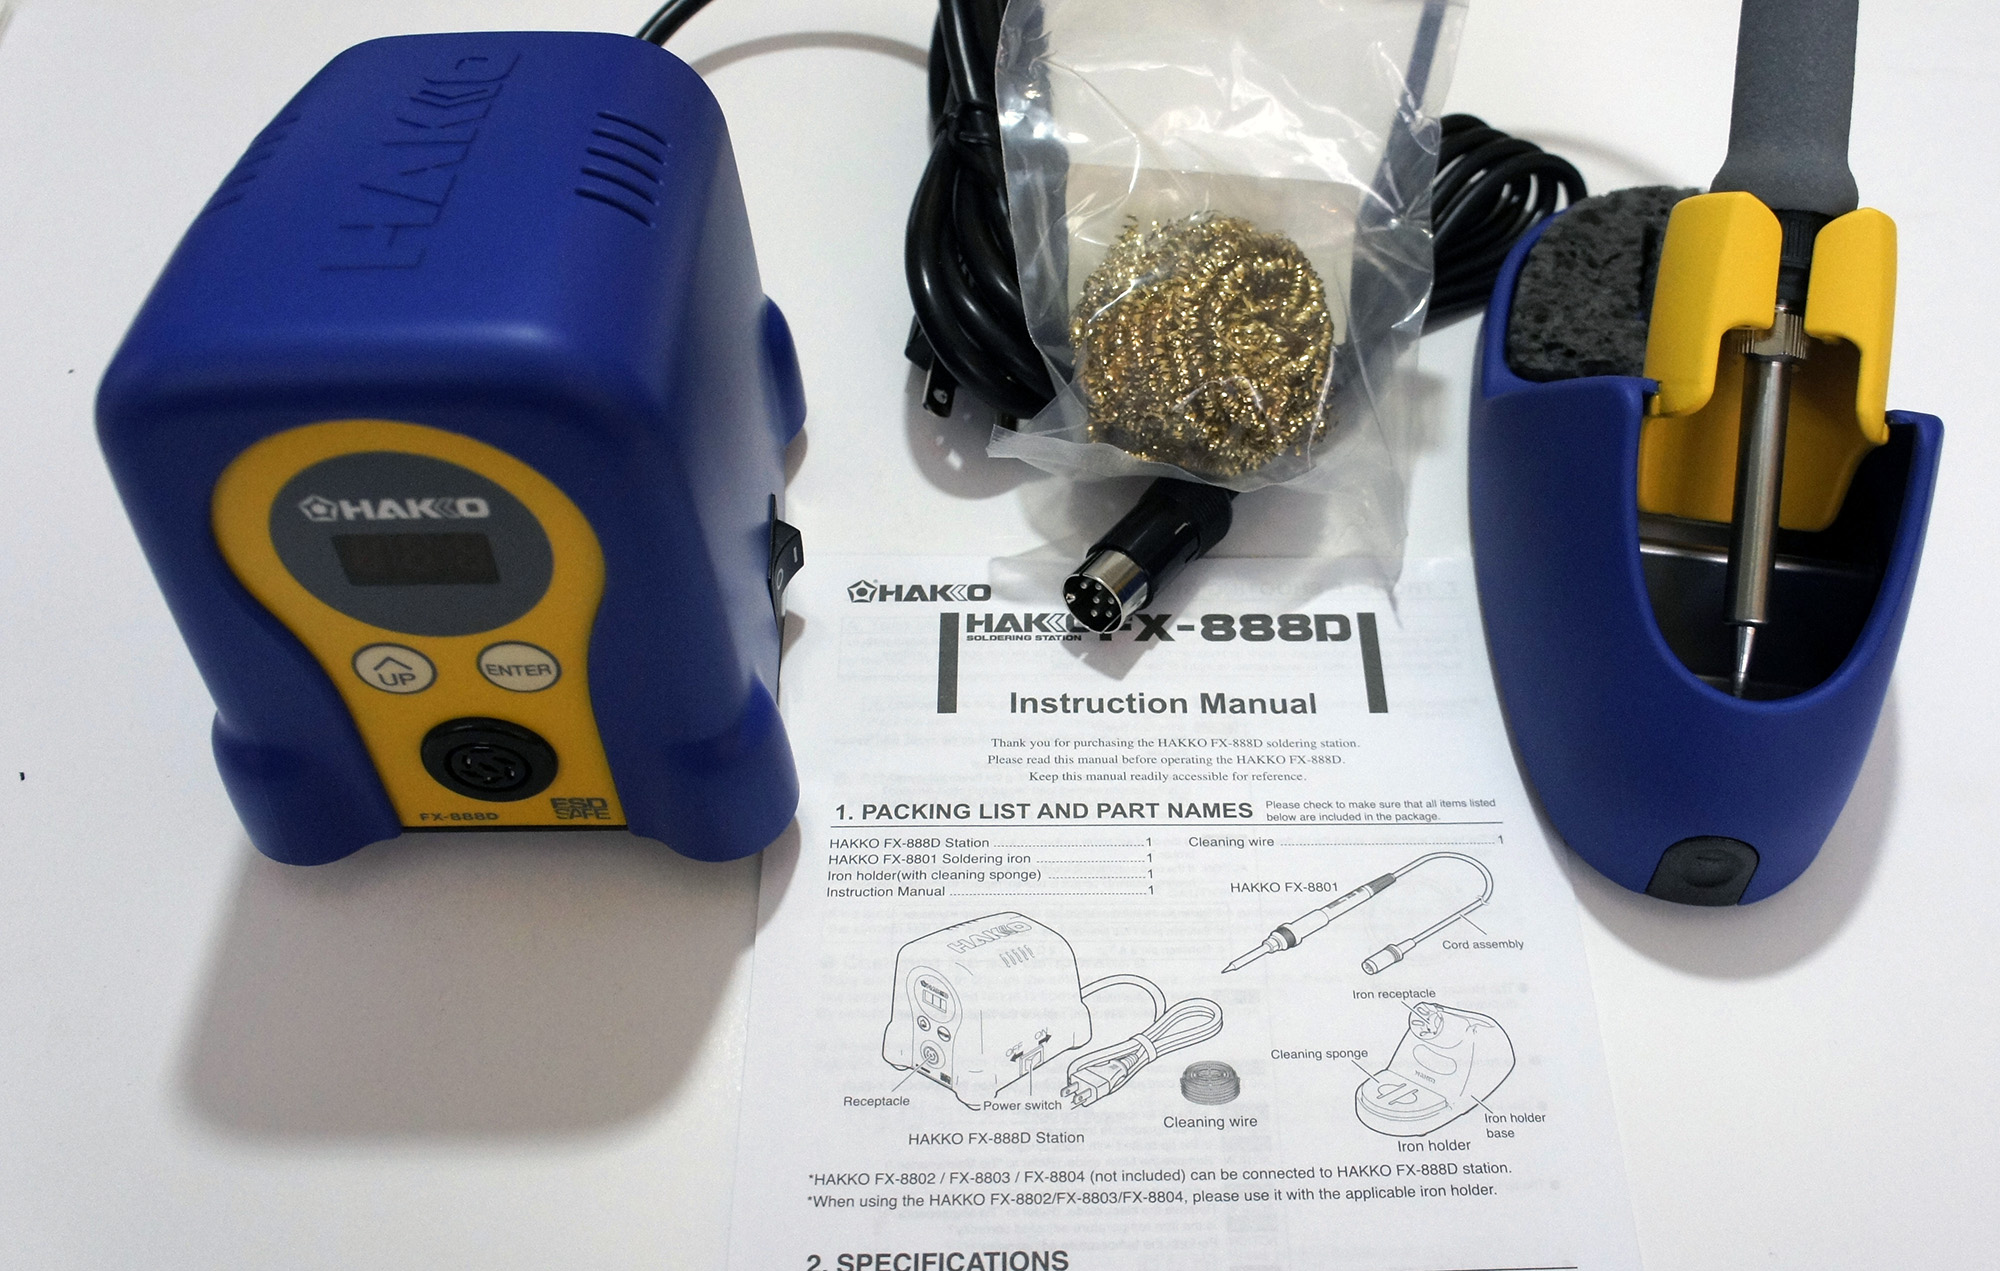

I also picked up some rosin-core solder, with the idea that it would be 60% lead and 40% tin, at the suggestion of my electrical engineer friend. However, despite the Amazon description, when it arrived it turned out to be 40% lead and 60% tin, but I figured I’d make do. I also picked up some solder wick and flux at my friend’s suggestion, since he assured me it’d make the process easier (it didn’t, I barely even used them).
Wanting to be safe, I asked the same electrical engineer friend if some paper towels on a glass table would make for a good soldering station. He reminded me that paper towels are quite flammable, and suggested that I at least consider a slightly less flammable dish towel as a workstation. I listened to his advice and went with that.
Soldering was a surprisingly easy process. The Hakko FX-888D is a great soldering iron; I just dialed in the temperature I wanted and I was ready to go. For the purpose of the keyboard, I opted to use 500°F as the temperature.
Despite my inexperience and lack of skill, the soldering process went fairly quickly and smoothly. All I had to do was touch the iron to the spot I wanted to solder, touch the solder wire to it, and let it melt right onto the connectors as I pulled away the iron.

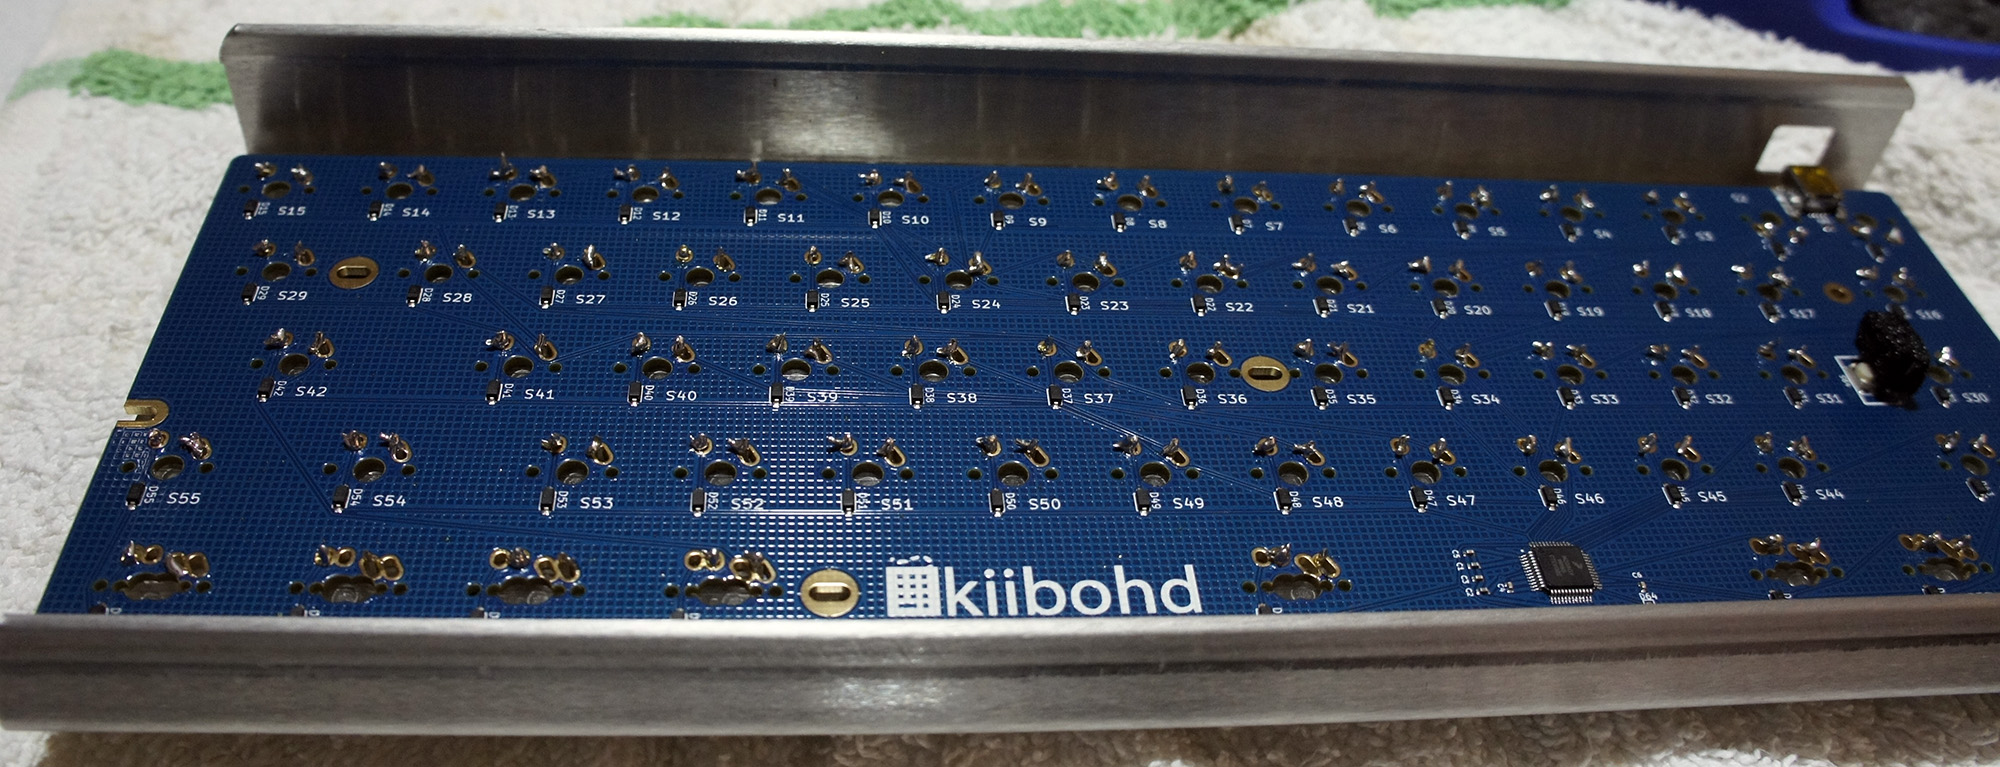
Once the soldering was done, I tested the keyboard to make sure all of the switches were reporting correctly. Each one worked perfectly, although my soldering job had much to be desired. Instead of nice, clean, smooth soldering, the back of the keyboard looks like a Terminator T1000 (the melty one) cried onto it. This made me regret choosing the open-backed chassis somewhat, since my soldering left the back of the keyboard sharp to the touch. I suppose I’ll just have to be careful when grabbing it.
Problems Arise
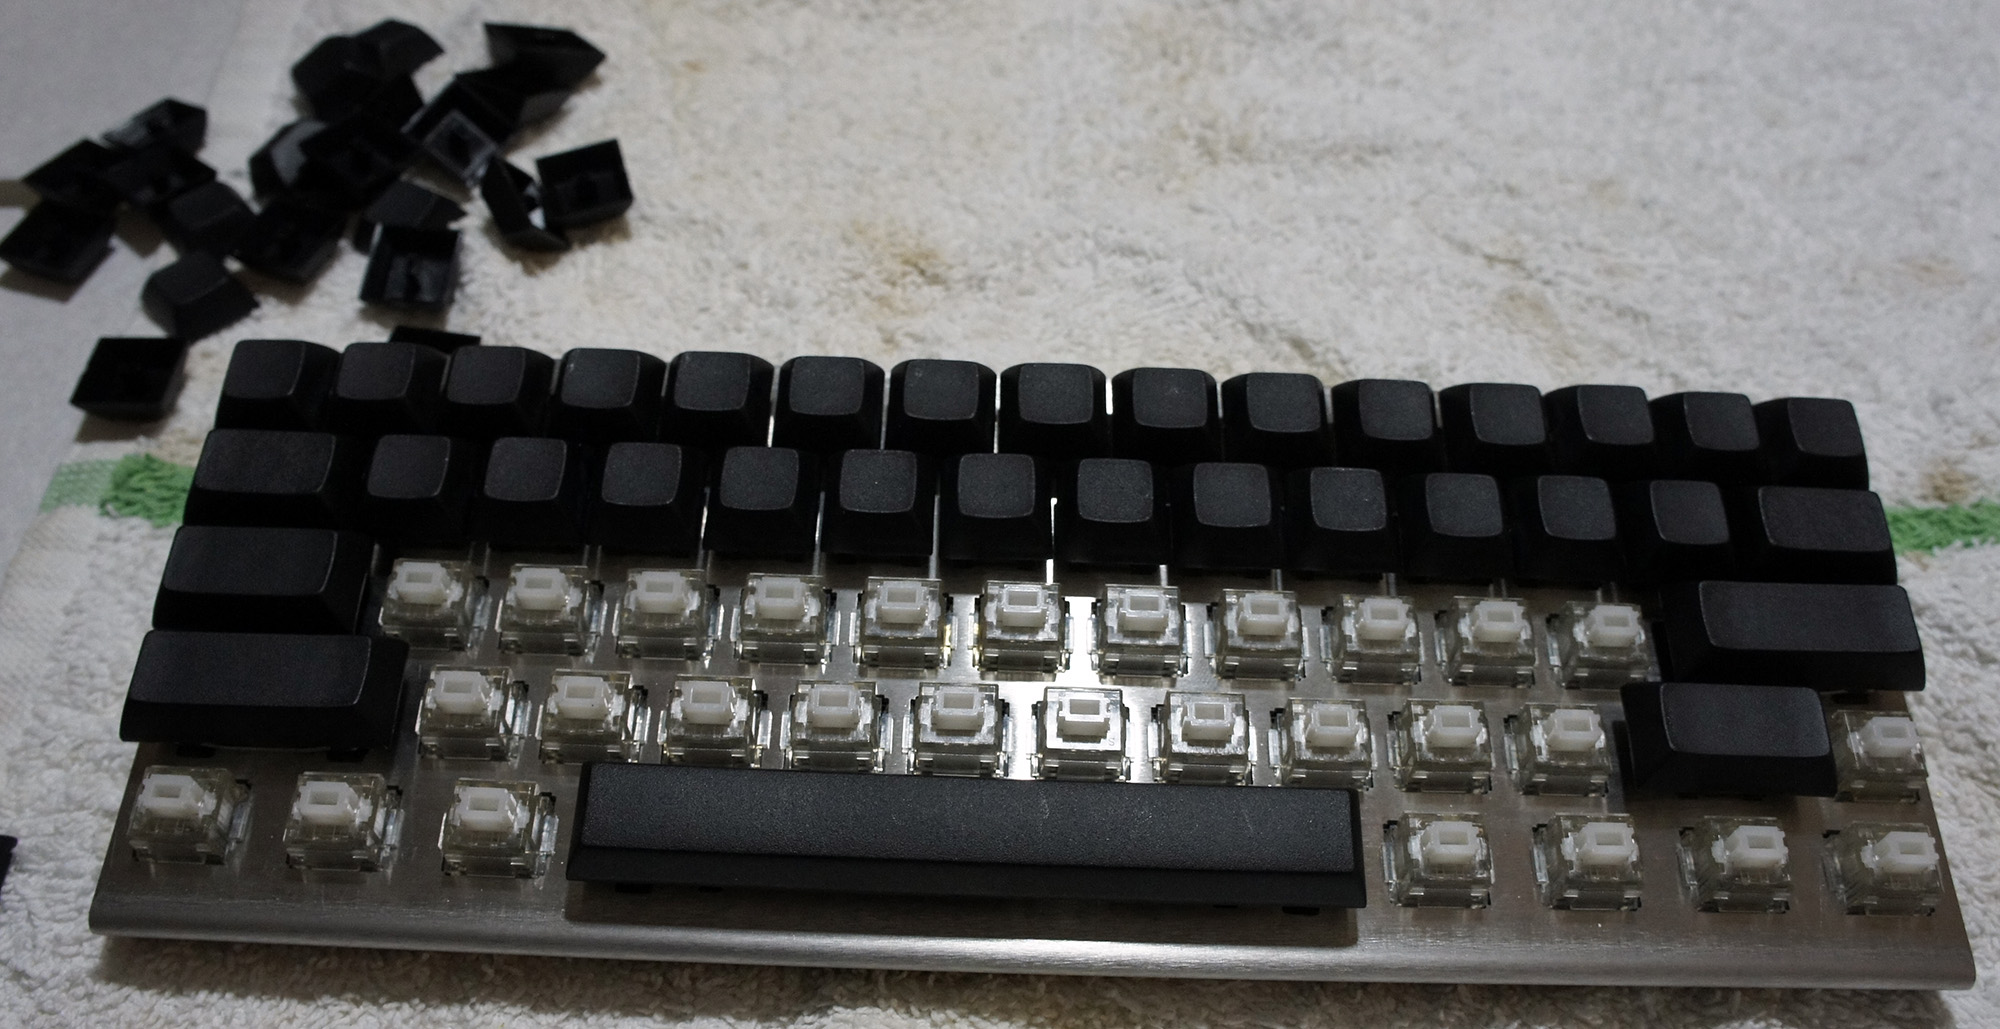
Next up was putting the keycaps onto the switches. Again taking the advice of the Massdrop discussion on the keyboard, I opted to start with the stabilized keys (spacebar, Enter key, etc).
I noticed the stabilizers that attached to the keys felt fairly loose in their housing. Luckily someone online had the genius suggestion to cut tiny squares out of the plastic baggies the parts came in, and use them as a shim for the stabilizers.

This worked beautifully, and made the stabilizers sit tightly in their housing. Although something like super glue would probably work just as well, that’s a much more permanent solution, and the name of the game with the Infinity Keyboard is modularity.
However, while putting in the spacebar, I messed up a bit and got the stabilizing wire stuck under the stabilizers. I figured I would correct this mistake by pulling out the spacebar and fixing it.

Unfortunately for me, the Matias key stems are exceptionally tight, so it took an extraordinary amount of force the get the key out (My poor key-puller just gave up, and I had to use my fingers and a screwdriver to generate enough force to remove it).
However, once I got it out, I fixed the stabilizing wire and got back to work putting on the keycaps.
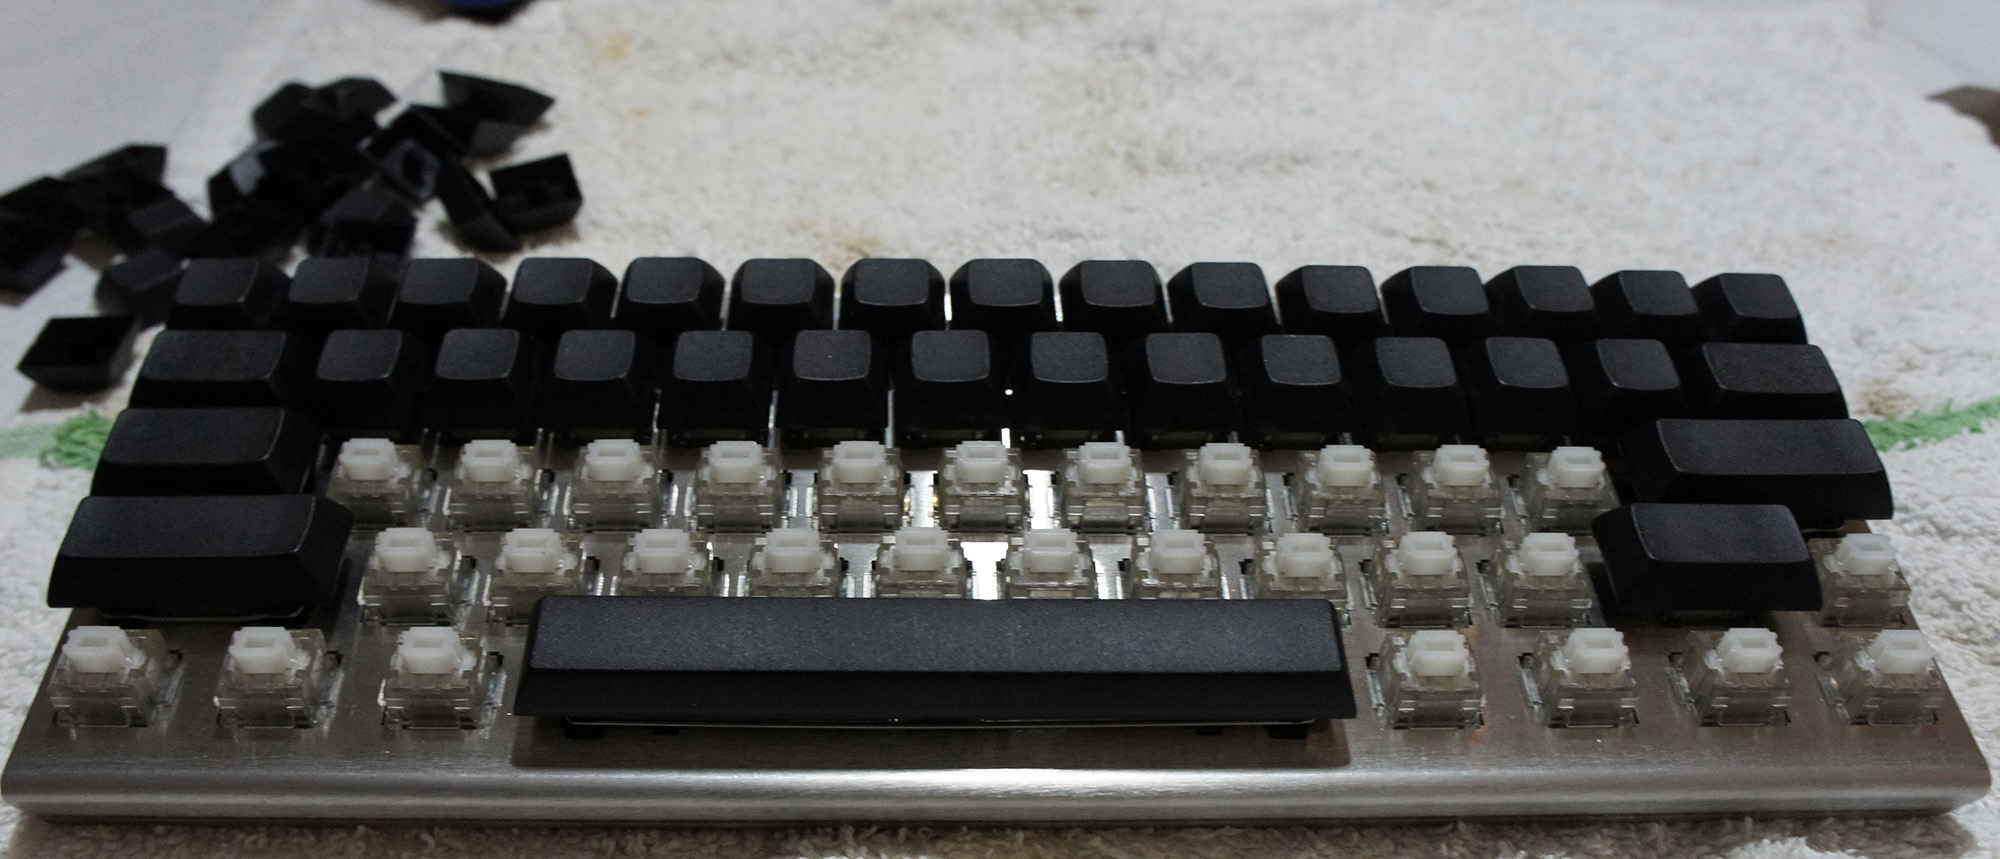
Once that was done, it meant I was done building my keyboard and it was ready to be used!
As you might expect by now, I had yet another unfortunate discovery when I began to type. All the keys worked well, except the spacebar would output anywhere between 1 to 10 spaces per keystroke.

At the suggestion of the Massdrop Infinity Keyboard discussion forum, it seemed like the best course of action would be to replace the key switch on the spacebar, as it had been speculated that maybe I damaged it when I removed the spacebar from it earlier.
Luckily for me, the keyboard kit included one extra key switch.
I figured the de-soldering process wouldn’t be much more difficult than the soldering process, but boy was I wrong.
The wick I had gotten barely soaked up any solder, and the solder was starting to get stuck in the holes in the logic board. As soon as I would melt it with my iron, it would solidify as soon as I started trying to push the switch out.
Eventually I pulled off enough solder to push the switch out, and replaced it with my backup switch. At this point I tested the keyboard with the new switch, and it worked flawlessly.
Now that I knew what I was doing, I was ready to put the spacebar onto the new switch and get typing.
However, nothing is that simple, and although I attached the spacebar without issue, the key tended to stick at the bottom of my keystrokes. This meant that I still ended up with unwanted spaces, although in some cases it meant I couldn’t hit the spacebar again when I wanted to.
At this point, I was out of extra key switches, and I knew that the force required when trying to remove the spacebar to try to diagnose the issue would cause the switch to break. I contacted Massdrop customer support to get some replacement switches and, hopefully, some advice.
They recommended trying to expand the spacers on the stabilizers, but that didn’t work. It also didn’t help that the spacebar appeared to be making contact with the keys directly above it and seemed somewhat out of alignment along the bottom.
I figured that maybe the spacebar was upside down, though the instructions never made mention of an ‘up’ and ‘down’ on the spacebar. Then again, the instructions were about as specific and helpful as a car-building manual comprised of useful steps along the lines of “get engine, put engine in car, apply wheels, finish car.”
Massdrop was kind enough to send me a free replacement key switch in preparation for the switch I was about to break. I also asked them send me a second backup switch in case I somehow managed to destroy the first backup, in case you are noticing a pattern here.
I removed the spacebar and switch using a soldering iron to loosen up the solder on the switch, pliers to pull the key switch out of the chassis, paperclips that were bent out of shape to pull on the spacebar, and my own tears of frustration. The tears were mostly a side effect, though I suppose they might have added some extra lubrication to the whole endeavor.
Once that was done, I put the new switch in the chassis, and plugged the keyboard in to test it and make sure everything worked properly.
After I was satisfied that the switch was fully functional, it was time to put in the spacebar.
I made sure the spacebar was flipped from the orientation it was in before (upside-down presumably). I attached the stabilizing wire to the stabilizers on the spacebar, and pushed it into place on the key switch.
To my dismay, the spacebar stuck at the bottom of the key press.
I immediately felt sheer terror at the nightmarish thought of having to remove the spacebar and key switch yet again.
In an act of desperation, I took a flathead screwdriver and pushed the one of the spacers out, certain it wouldn’t work.
To my amazement, the spacebar now moved freely.
Feeling like Thomas Edison probably felt when he pretended that he invented the lightbulb, I plugged the keyboard in to test each key.
My feeling of elation was quickly quashed as the “1” key didn’t seem to register key presses. The fear of having to replace a key switch was back almost as soon as it had gone. Feeling like I had eaten some bad Indian food, the sensation of fear in my gut returned as quickly as it had faded.
It looked like the soldering on the switch seemed ok, but given my complete ineptitude when it came to soldering, I figured I would melt it down a bit more to make absolutely certain it was making contact with the board.
A few seconds later, I plugged the keyboard back in, and finally everything worked properly.
I knew at the time that I should be feeling pride and joy for having completed my project successfully, but one singular thought consumed my mind: “never again”.
Conclusion
I got the Infinity Keyboard kit at a price of $157 after tax and shipping, with the intention to use it as a learning opportunity as well as benefit from having a rather unique 60% keyboard.
(A brief aside – keyboards tend to come in a few different sizes, most commonly: Standard, which includes all the typical keys, Tenkeyless [TKL], which excludes the number pad, and 60%, which excludes the number pad, arrow keys, and Home/Insert/Page Up/etc. keys.)
I certainly got my money’s worth as far as learning experience goes, though I was hoping the process would have been a bit more painless (emotionally and physically). I ended up with a fairly unique keyboard though, which I’m sure will impress all the people I know. It’s a known fact that nothing impresses people more than a keyboard.
At least the next time I build a keyboard (never), I’ll know what I’m doing. Also, as far as the key configuration goes, I have the option to compile my own firmware (as a software developer, this option disgusts me), use the default (as an enthusiast, this option disgusts me), or use the new Infinity configurator (as a lazy person, this option disgusts me). Oh well. I guess into the closet it goes.
Review: Netgear ProSAFE 8-port Gigabit Click Switch (GSS108E)
A few years ago, I was hosting a LAN party at my apartment. One of my friends was setting up his stuff and asked, “How do I connect to the internet?” I told him to just plug his Xbox and computer into the gigabit switch. He responded by giving me a look like the one below, asking “what the heck is a gigabit switch?”

I thought the answer was obvious, but apparently the average consumer does not know what a gigabit switch is. I suppose the more accurate term for one would be “Gigabit Ethernet Switch”.
An Ethernet switch refers to a device with a bunch of Ethernet ports on it for devices to plug into. The Ethernet switch is then plugged into a router, which is plugged into a modem, which is connected to the internet (hopefully). Think of it as a power strip for internet.
However, a switch should not be confused with a router – a router assigns devices IP addresses and routes traffic, an Ethernet switch just allows more devices to connect to a router. The “Gigabit” part of “Gigabit Ethernet Switch” refers to the speed provided by each Ethernet port on the switch, which is one gigabit (equivalent to 1/8th of a gigabyte) of data per second.
I have a few gigabit switches I keep handy. I use one of them for my own home networking, and the rest sit in a duffle bag affectionately known as the LAN-in-a-bag, or LANbag (which contains gigabit switches, Ethernet cables, power strips, extensions cords, etc.). All my gigabit switches are unmanaged, which means they handle all traffic agnostically. An unmanaged switch is basically just a ‘dumb box’ that doesn’t know or care about the devices connected to it or the traffic passing through it.
A managed switch has all sorts of configuration options, such as a command-line interface, remote management access, a web interface portal for management, along with all sorts of other more technical features. These are typically used for medium to large scale enterprise solutions.
Netgear sent me their ProSAFE 8-port Gigabit Click Switch (GSS108E) for review, which isn’t clearly defined as a managed or unmanaged network switch. With regards to features and price, it seems to fit in with Netgear’s line of Unmanaged Plus Switches, though the line of Click Switches is technically separate from the Unmanaged Plus Switches.
This designation is a bit of a misnomer, since both the Cllick and Unmanaged Plus lines have management features, though not as many as a full-fledged managed switch would. Wikipedia defines this category as “Smart Switches”, which are is a subcategory of managed switches.
Being “Smart” means that the Gigabit Click Switch (GSS108E) can do all sorts of things unmanaged switches can’t do such as QoS (Quality of Service, which effectively allows the user to determine a hierarchy of priority for different types of traffic, like giving online gaming priority over torrenting for example), rate limiting (which is handy for all sorts of useful stuff like throttling your roommates’ internet to make sure you get all the bandwidth), and the ability to create a VLAN (virtual local area network, which is essentially a sub-LAN on an existing physical LAN).

The Click Switch line is part of Netgear’s ProSAFE collection, which is Netgear’s Business/Professional class of network devices. Because of this, a lot of features the Gigabit Click Switch (GSS108E) supports will likely only be used in a business environment, but it still has a place in the home as well for the same reason you likely drive a car with features you never knew about, let alone use – it’s nice, works well, and the extra features are something to brag about, or use if you ever get around to reading the manual.
I know those of you who don’t know or care about the technical details of networking probably just skimmed over the last two paragraphs, though I question why you’d be reading a gigabit switch review in the first place…
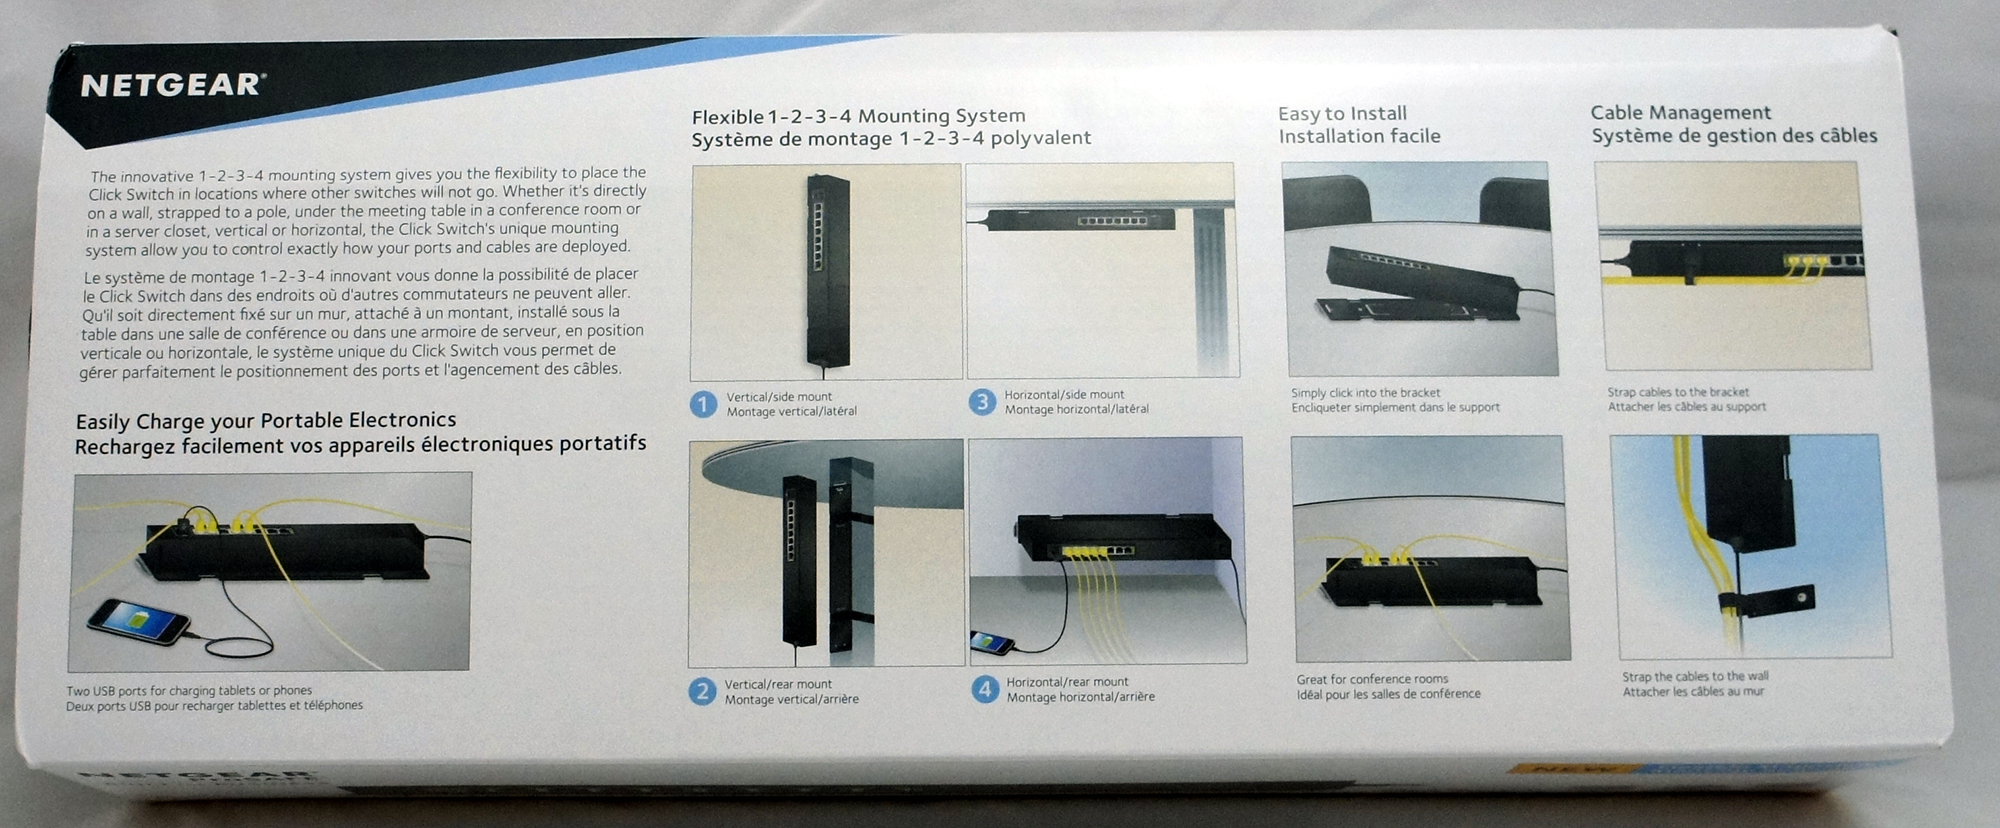
The “Click” in the Gigabit Click Switch (GSS108E) refers to the most visible feature of the switch – the easy mounting bracket that allows for four different mounting configurations. It can be mounted horizontally, either from the rear or from the bottom, as well as vertically, also from the rear or the bottom, for a total of four possible configurations.
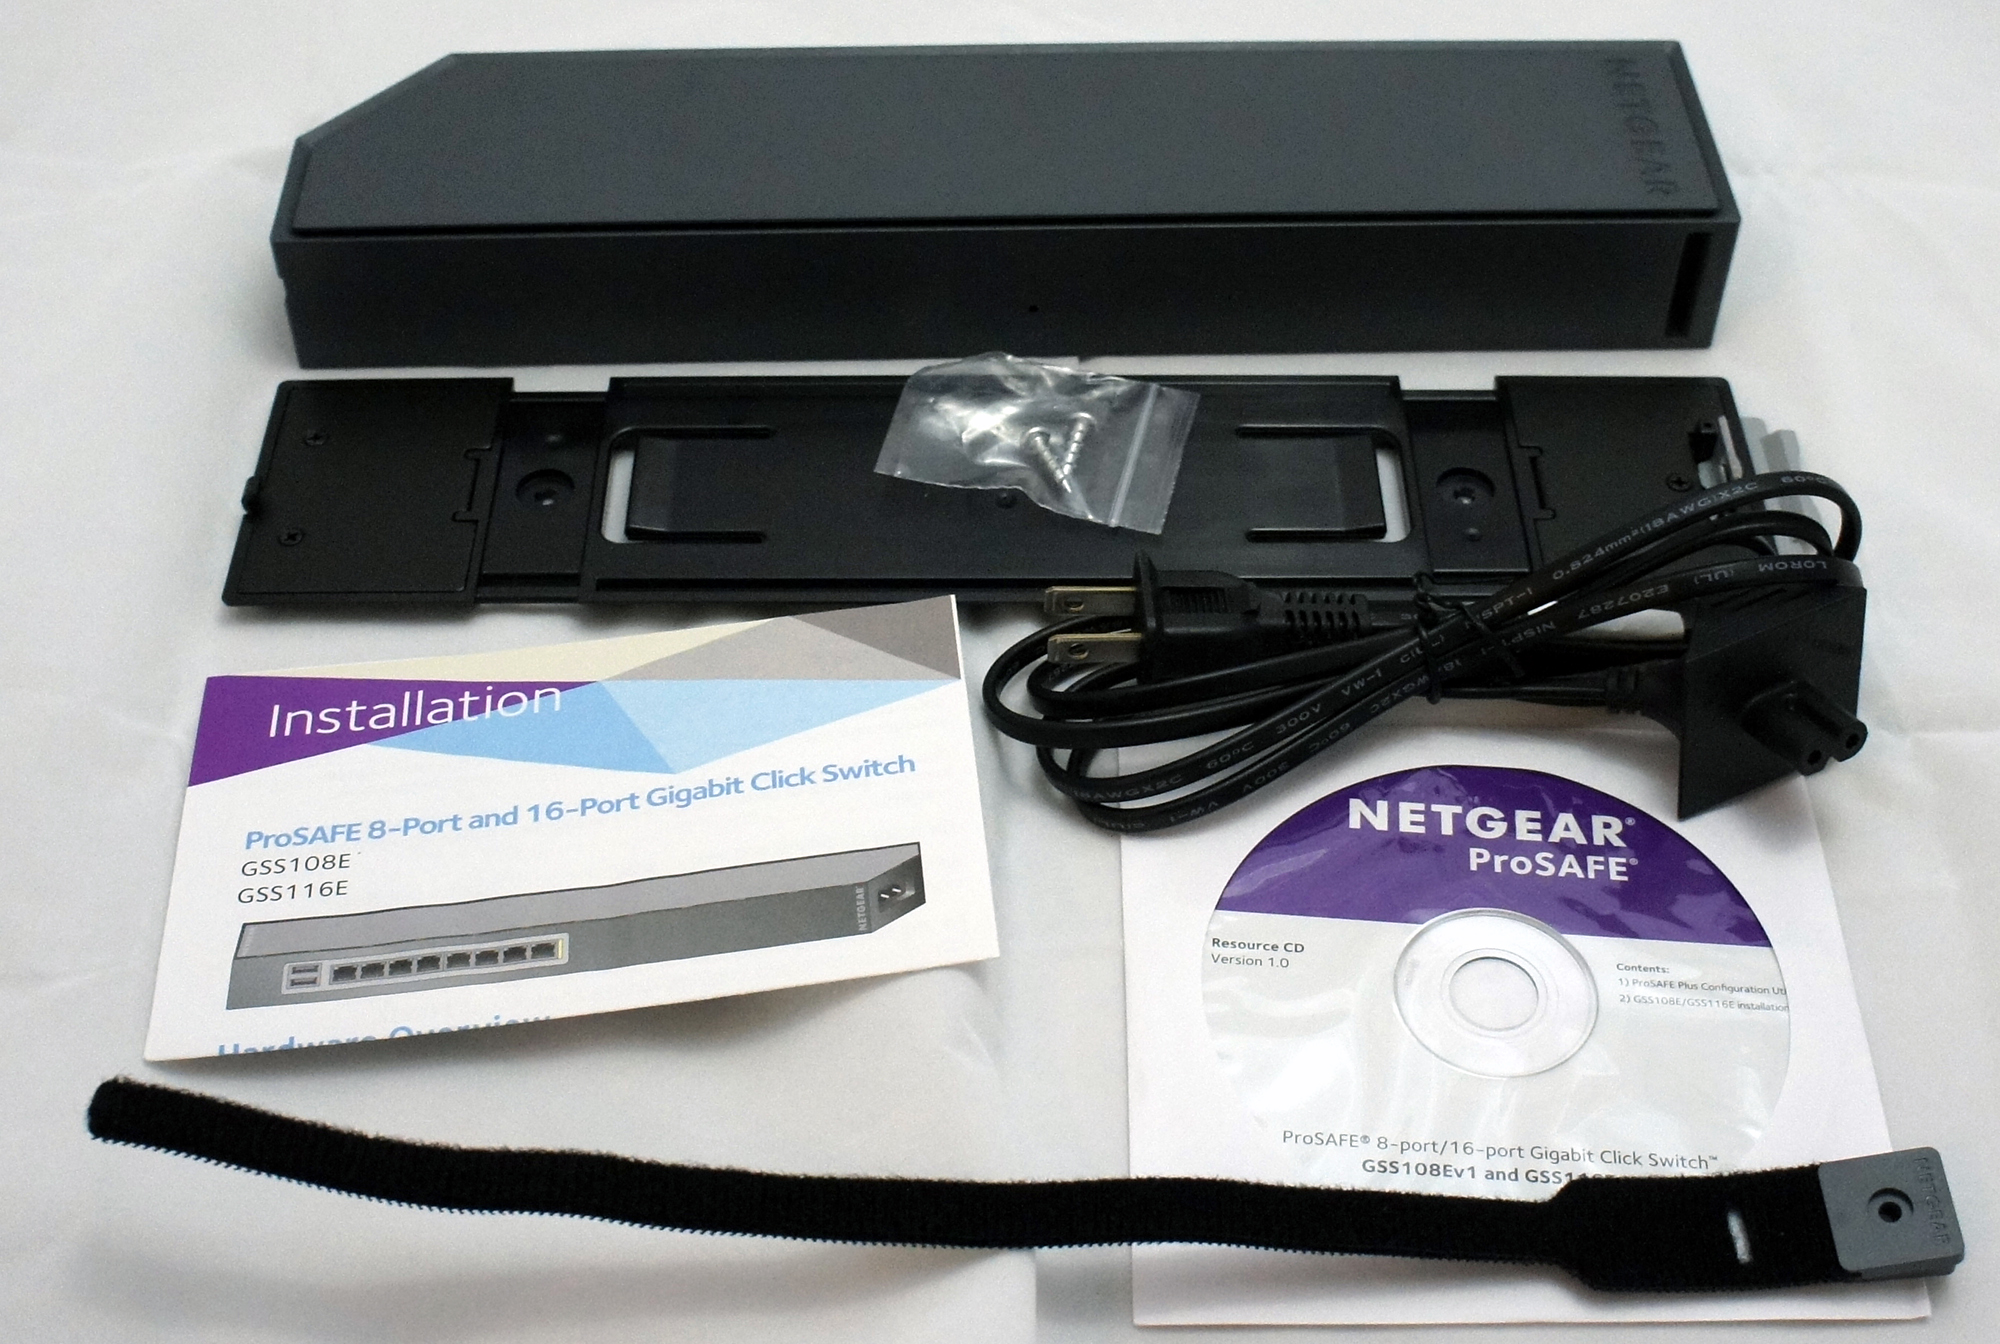
Personally, I don’t have a good place to mount the switch in my apartment, and I imagine the leasing company may take issue with me screwing a gigabit switch into a wall. I could attach it to my desk, but considering I have years-old Ikea furniture I’m always on the verge of replacing, I figure it’s not worth my time or effort at the moment. If I were to mount the switch though, it’s very easy, it just requires use of the two simple screws that came with the switch.
The switch is much longer than a typical unmanaged eight port gigabit switch, but of course, it has all sorts of management features that require additional internal hardware, and since you’re expected to mount it on a wall or under a desk, the difference in size hardly matters. There’s an obvious joke to be made here, but I like to think I’m above that. (I’m not).

The Gigabit Click Switch (GSS108E) works beautifully as a plug n play unmanaged switch, requiring no initial configuration unless you want to do it.
If you do decide to customize the settings on the switch, you can either do it via access to a web portal, or you can use Netgear’s ProSafe Plus Switch Utility software, which has quite a lot of options. The guide for that can be found here if you want to spend your evening reading technical manuals.
To be perfectly honest, I have very little experience with professional-level networking, so many of the options were beyond my need or understanding. However, the ability to manage traffic over the switch is fantastic. For users that have a mediocre or poor router, the gigabit switch can make up for a lot of the router’s deficiencies (provided the user’s devices are plugged into the switch. A switch won’t help improve Wi-Fi signal or speed in the same way that a surge protector won’t improve your cell phone signal or speed, they’re not related).
The full feature list for the Netgear ProSAFE Gigabit Click Switch (GSS108E) is below:
Hardware
- 1-2-3-4 Click Mounting system allows for
- Vertical/side mount
- Vertical/rear mount
- Horizontal/side mount
- Horizontal/rear mount
- Multi-directional power cable can be routed outwards or downwards
- 2 Quick access USB charging ports for tablets or smartphones
- Rugged reenforced plastic (8-port) and metal (16-port) case
- Internal power supply eliminates the wall wart power adapter
- LED lights can be turned off for non-distracting placement next to a TV
- Silently runs without a fan
Traffic Management
- Auto Negotiation of speed and duplex modes
- 2x Flow Control
- DHCP Client
- Dynamic MAC address management
- 1Q-based or port-based VLAN
- QoS based on WRR, strict priority, or both
- Port-based and IEEE801.2p-based QoS
- QoS based on ToS (Type-of-Service)
- DSCP Support
- Rate Limiting
Multicast Efficiency
- IGMP snooping, v1, v2 and v3
- IGMP Snooping querier (16 and 24 port models only)
- Blocking of unknown multicast traffic
- Act as static multicast router port
Reliability, Performance and Troubleshooting
- Port mirroring both on ingress and egress traffic
- Jumbo frame support
- Broadcast Storm control
- Cable diagnostics
- Loop Detection
- DoS Prevention (GSS116E Only)
- Energy Efficient Ethernet (IEEE802.3az) compliant
Switch Management
- Plus Utility
- Web-based Management
- Firmware Upgrade thru Plus Utility (TFTP)
- Firmware Upgrade thru Plus Utility (TFTP)
- Configuration Upload (to Server)
- System password protection
Another huge benefit of getting a Netgear ProSAFE switch is that they all come with Netgear’s ProSAFE Lifetime Hardware Warranty, as opposed to many consumer-grade switches which come with a warranty of just one year. This will be convenient for when you one day damage your gigabit switch in an unfortunate boating accident; the lifetime warranty will have you covered. (I’m fairly certain the warranty doesn’t actually cover unfortunate boating accidents).
The full specifications for the Netgear ProSAFE Gigabit Click Switch (GSS108E) are below:
- Model Description: 8-port Gigabit Click Switch
- Gigabit Ports: 8
- USB Charging Ports: 2
- Max MAC entries: 8K
- Buffer Size: 2 Mbit
- VLAN (Number Supported): 64
- Supported Multicast Groups: 128
- Auto Denial-of-Service Prevention: No
- Port Trunking: No
- Max Number of Source Ports Allowed (Many to 1): 1
- LED Lights Off for Stealth Operation: Yes
- Internal/External Power Supply: Internal
- Max Power Consumption (Watts): 14w
- Number of Fans: 0
- Acoustic Noise Level @25C (dBA): 0
- Operating Temperature: 32° to 104°F (0° to 40°C)
- MTBF: 1,031,177 hours
- Weight (kg): 44kg
- Dimensions (WxDxH) mm: 305 x 65 x 35mm
- Case Material: Plastic
- Electromagnetic Compliance (A or B): B
As listed in the specs, the switch has eight gigabit Ethernet ports, and it also includes two USB charging ports. These are nice additions as the presence of the USB ports differentiates the Click switch from other eight port gigabit switches, even to the casual observer. Some casual observers might mistake the USB ports for something silly like Firewire or HDMI, but that’s the fault of the observer; USB ports look nothing like Firewire or HDMI.
The Netgear ProSAFE 8-port Gigabit Click Switch (GSS108E) currently retails for $69.99.
There are a couple things the average consumer may want to consider. Unmanaged consumer-grade eight port gigabit switches can be found in the approximate $25-$35 range, so for someone looking for something very basic to just extend the number of Ethernet ports available to them might find the GSS108E might be too pricey.
On the other hand, someone who has a poor to mediocre router might want the extra features included in the GSS108E, with the added benefit of the USB charging ports. In that case, the $69.99 GSS108E is a great value.
Also, power users may want a gigabit switch with the modular mounting capabilities and advanced network management options the GSS108E provides, for far less than a typical managed gigabit switch would cost.
In that same vein, businesses both large and small would likely benefit from an affordable switch which has a place in any conference room or at the hub of any set of desks.
Gigabit switches are not something I typically put a lot of thought into, but thankfully Netgear does. The Netgear ProSAFE 8-port Gigabit Click Switch (GSS108E) certainly packs more features and value than I expected in a sub-$100 gigabit switch.